From the BlogSubscribe Now

10/27/15 Fuji X-Trans Raw Conversions–Which is best Lightroom or Capture One

In 2015, Arkansas did not present a good color display really anywhere throughout the state.  Since July Arkansas has been short on rainfall and the month of September and first half of October no measurable rain fell in the state.   Most of the trees just turned brown.  There were some spots that held OK color, but they were the exception.  Since 2014 was such a great year on the Buffalo National River for fall colors, I have been going back over some of my shots.  Many times I was using my Fuji X-T1.  I realized once again that there is still no perfect raw conversion software for Fuji files however it does seem to me that Lightroom CC has made some improvements.

Since the announcement of the Fuji X-Trans cameras, which now max out at 16MP in an APS-C format, there has been a lot written about which raw conversion software provides the best output.  At present there are three main solutions:

  1. Iridient Developer
  2. Lightroom CC 2015
  3. Capture One by Phase One

I have worked with all three and since Iridient chooses to only work on the MAC platform, I rarely use it.  I prefer to do the majority of my work in either Lightroom (LR) or Capture One (C1).  One of the single largest issues that comes up with Fuji raw files is how to get the most detail out of the files.  Due to the different layout on the CMOS chip, the Fuji raw file needs a different domosaicing algorithm than most Bayer pattern CMOS sensors.  You can easily find out about the differences by a quick web search and since so much has been written already I am going to move on to the actual raw conversions.

With the Fuji files, I personally don’t think you can make definite all or nothing statements, as C1 gets around the issues by applying too much blur in the demosaicing alogrithim, and LR seems to pull out the edges a bit more than necessary, neither of the tools seem able to get all the surface details that are there, (when you use Iridient developer for example). To me C1 has some positives, but so does LR and in no way do I see C1 as the end all to Fuji conversions.

But to my eyes, many times the LR conversion looks better and holds up for sure in a interpolation scheme for making a larger print. Color out the gate C1 wins more times than not, but I can get there in LR. Overall I feel the C1 images converted loose too much details and get a bloated look where as the LR files can start to take on a overdone look which is some cases can start to look painterly.

But for sure I can’t say C1 is better than LR or vise versa and I have been working on Fuji X-trans files now since early 2013. LR has gotten better in that it no longer has the issue with haloing around green/blue transitions, which was such an issue before.

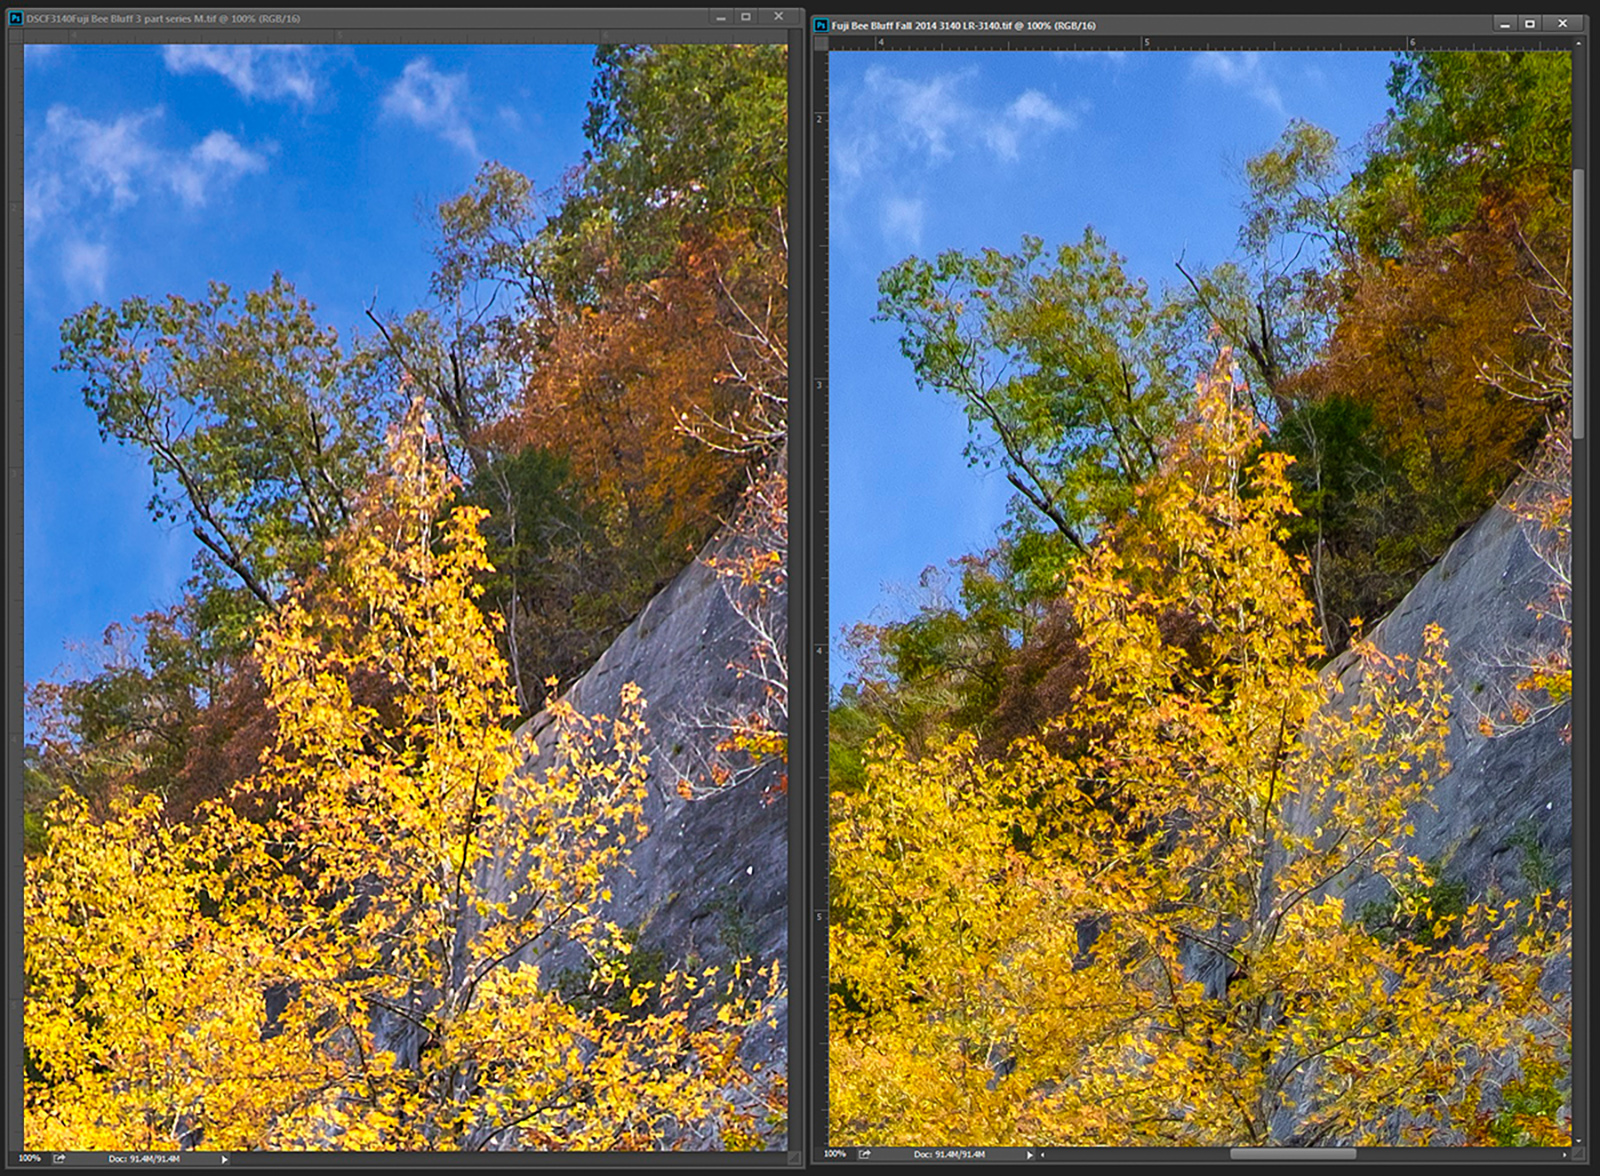
Here is a side by side comparison of a Fuji X-T1 raw taken in the fall of 2014.  Note that what I am writing holds true for the X-E1, Xe2 and XT1 as they all share the same sensor.  Click on the image at anytime to view it larger. I used the 18-55 on the X-T1 and as I recall the file was taken at 200 iso.

Fuji X-T1 raw file conversion

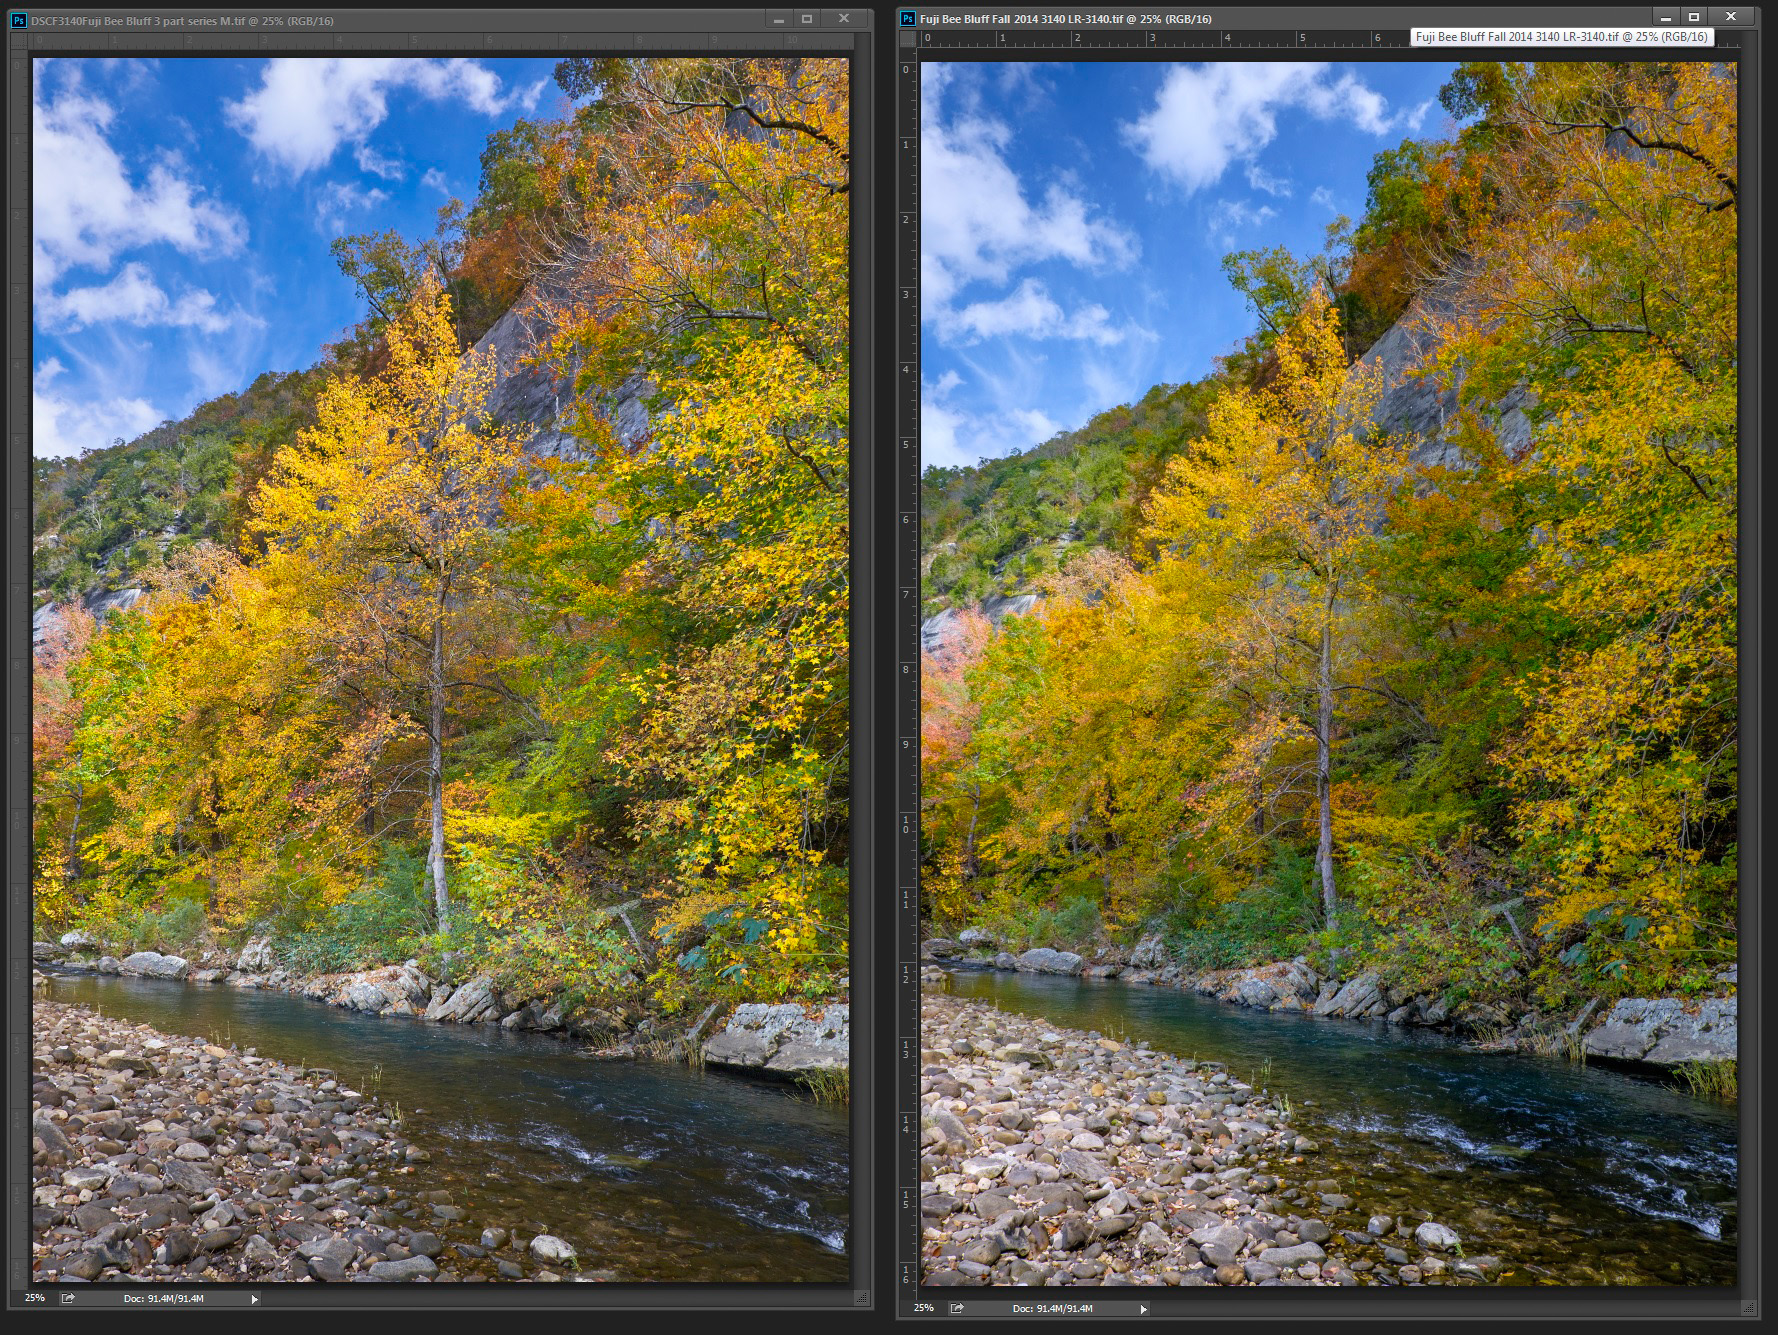
A side by side conversion, Fuji X-T1 file in C1 and LR

In this example, I have taken a typical photo from one of my Arkansas landscape studies.  This image is the middle of a 3 part panorama series I took.  In this case I was not looking for a true 1:3 ratio pano, but instead I planned to stitch the 3 files into 1 normal 3:2 landscape shot which would allow me to have more resolution for printing.  I do this often in my work.  Out the gate, I feel that the C1 image has a bit better representation of the color that was displayed, however the LR file is not far off.  This type of shot is a hard one to work since I had to expose for the sky and still have enough room in my foreground to pull up the shadows without losing too much details to noise.  Both C1 and LR were able to give me the strong yellows and reds that were available and also provide for a nice tone to the blue sky.  But now lets look at a few crops from each of these files.  To capture these crops, I opened both images in Adobe CC 2014 and then selected view at 100%.  I feel that the only way to really tell how well a image file will hold up in printing is to view at 100%, not view at print size.

With each file I used the default sharpening of the raw converter, in fact I added a bit more to the C1 conversion as I felt the default left too many details on the table.

Fuji X-Trans raw conversion comparison

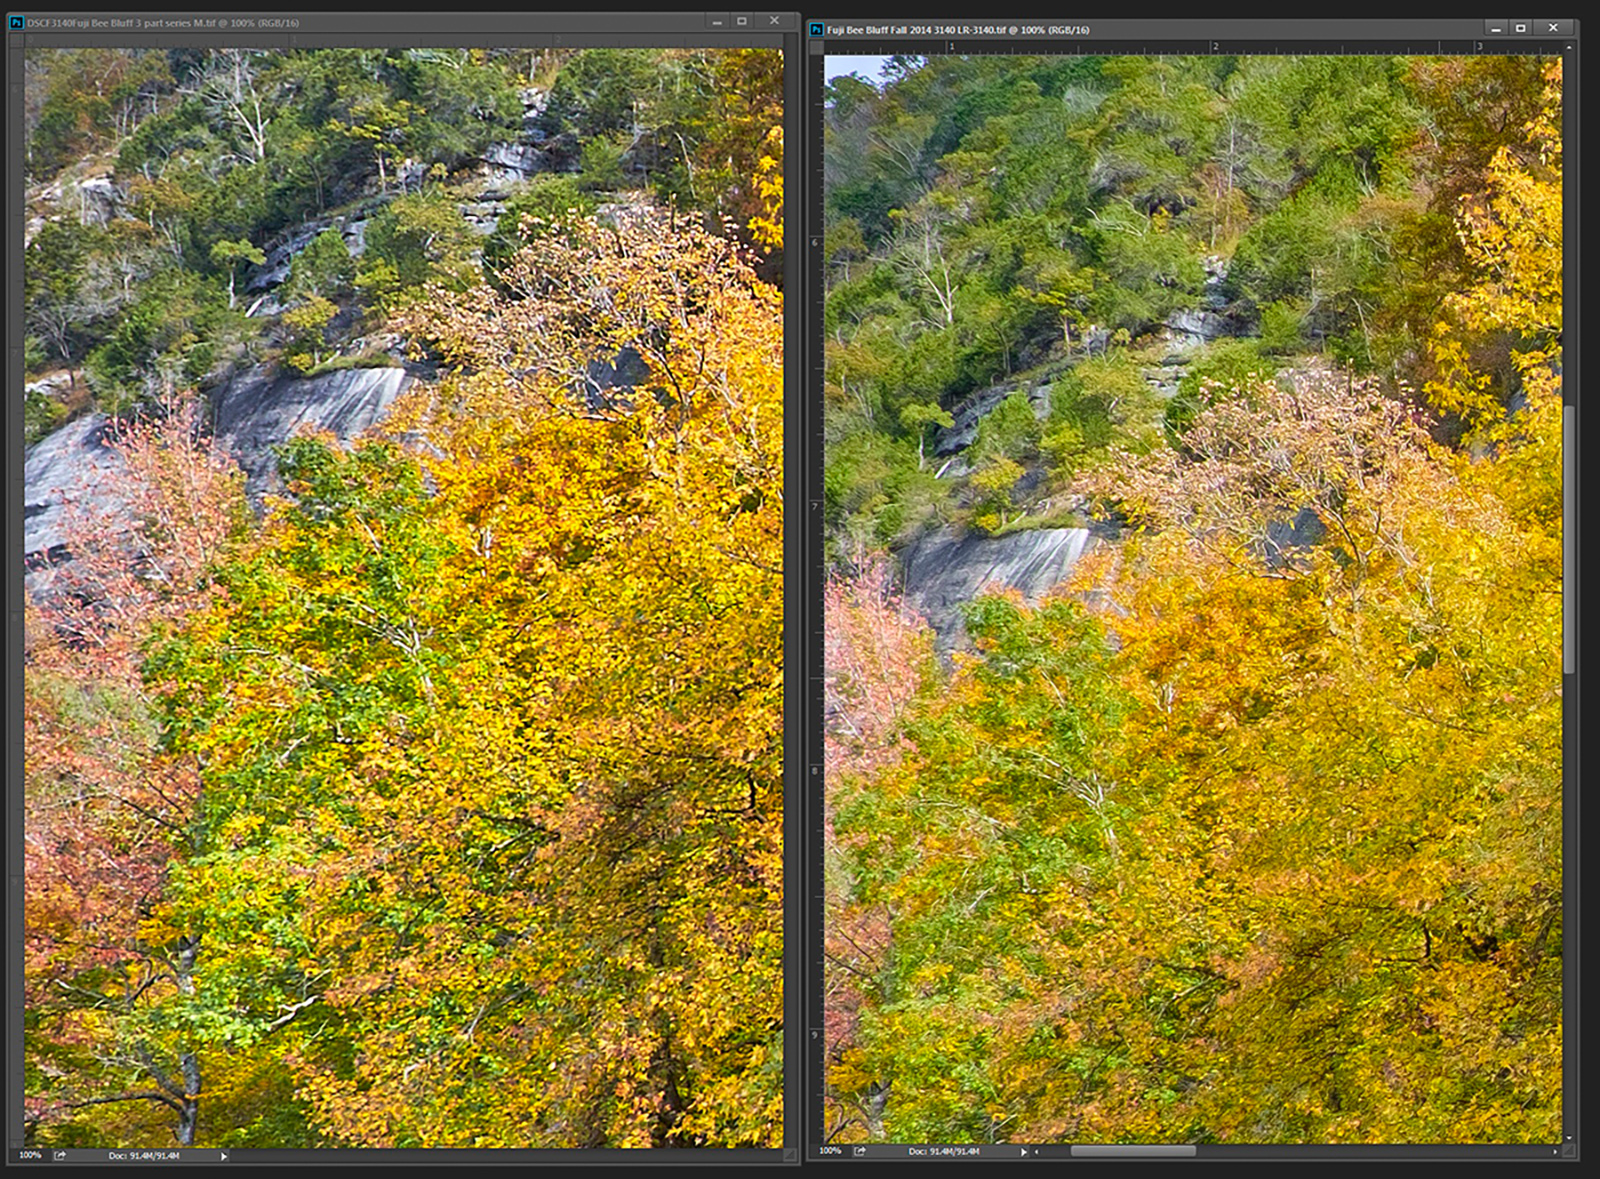
Example No1 Fuji X-Trans C1 and LR comparing file details

The LR conversion is on the right, click on the image to view it as large as possible.  You can start to see that the C1 conversion appears a bit soft and begins to take on a interpolated look to the finer details.  Areas that stand out to my eyes, are the green trees on the distance hillside and the bare tree trunks.  When I look at those parts of the files, the LR conversion just looks better, whereas the C1 image is quite soft.  Also look into the yellows on the gum tree in the foreground.  The LR image may yet be just a bit soft but you can still see more details in the leaves.  If you were to attempt to interpolate this file to print it larger, the C1 image is going to give way to a much softer look.  On the Fuji image I would want to run one round of “Focus Magic” to add just a bit more detail to the yellows and greens.

Fuji X-Trans files

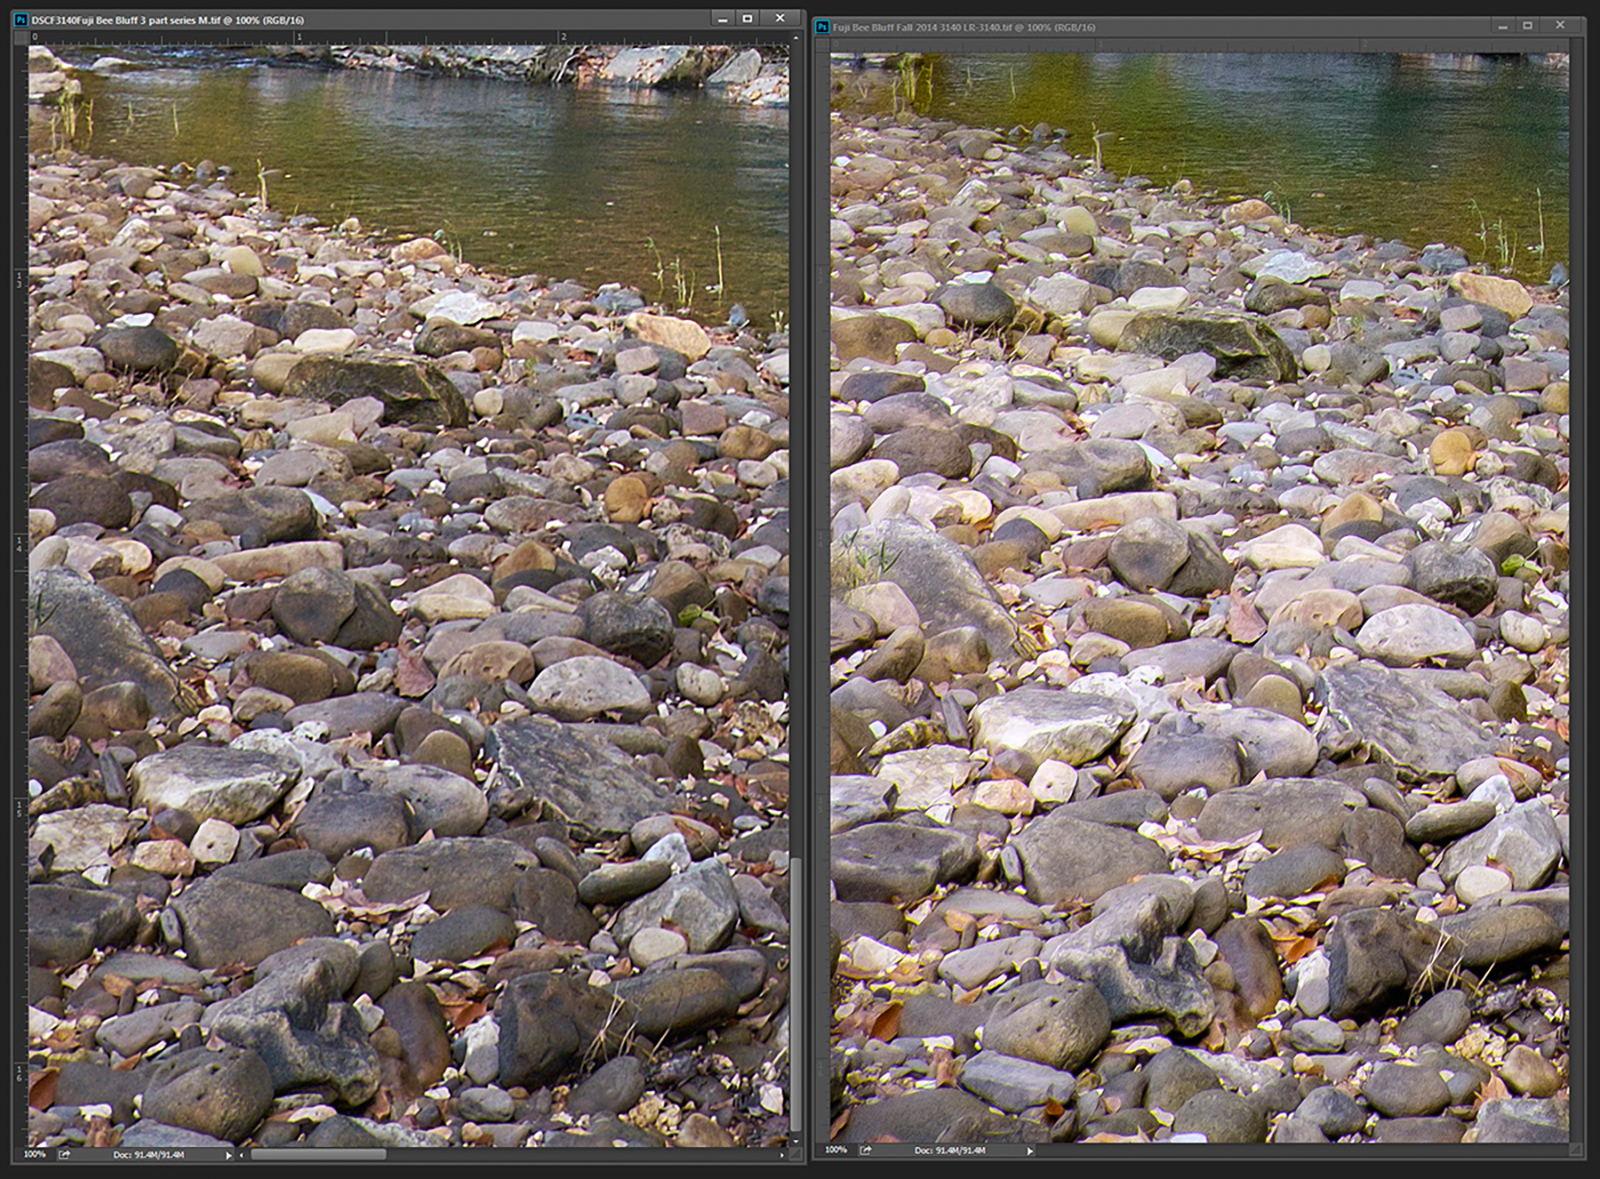
Example 2 , C1 and LR a comparison in raw conversion software.

A close up on the lower left of the shot. Rocks can pose problems and usually I have given C1 the edge here, however with the latest round of ACR in LR, it’s improved and I have to give LR just a slight edge.   The LR conversion has a bit more even look to it, but the overall amount of details seems about the same to me.  The details left out of C1 could easily be picked up again with any third party sharpening solution such as “Focus Magic” or “Topaz In-Focus” both of which use deconvolution algorithms.

Fuji X-Trans raw file conversions

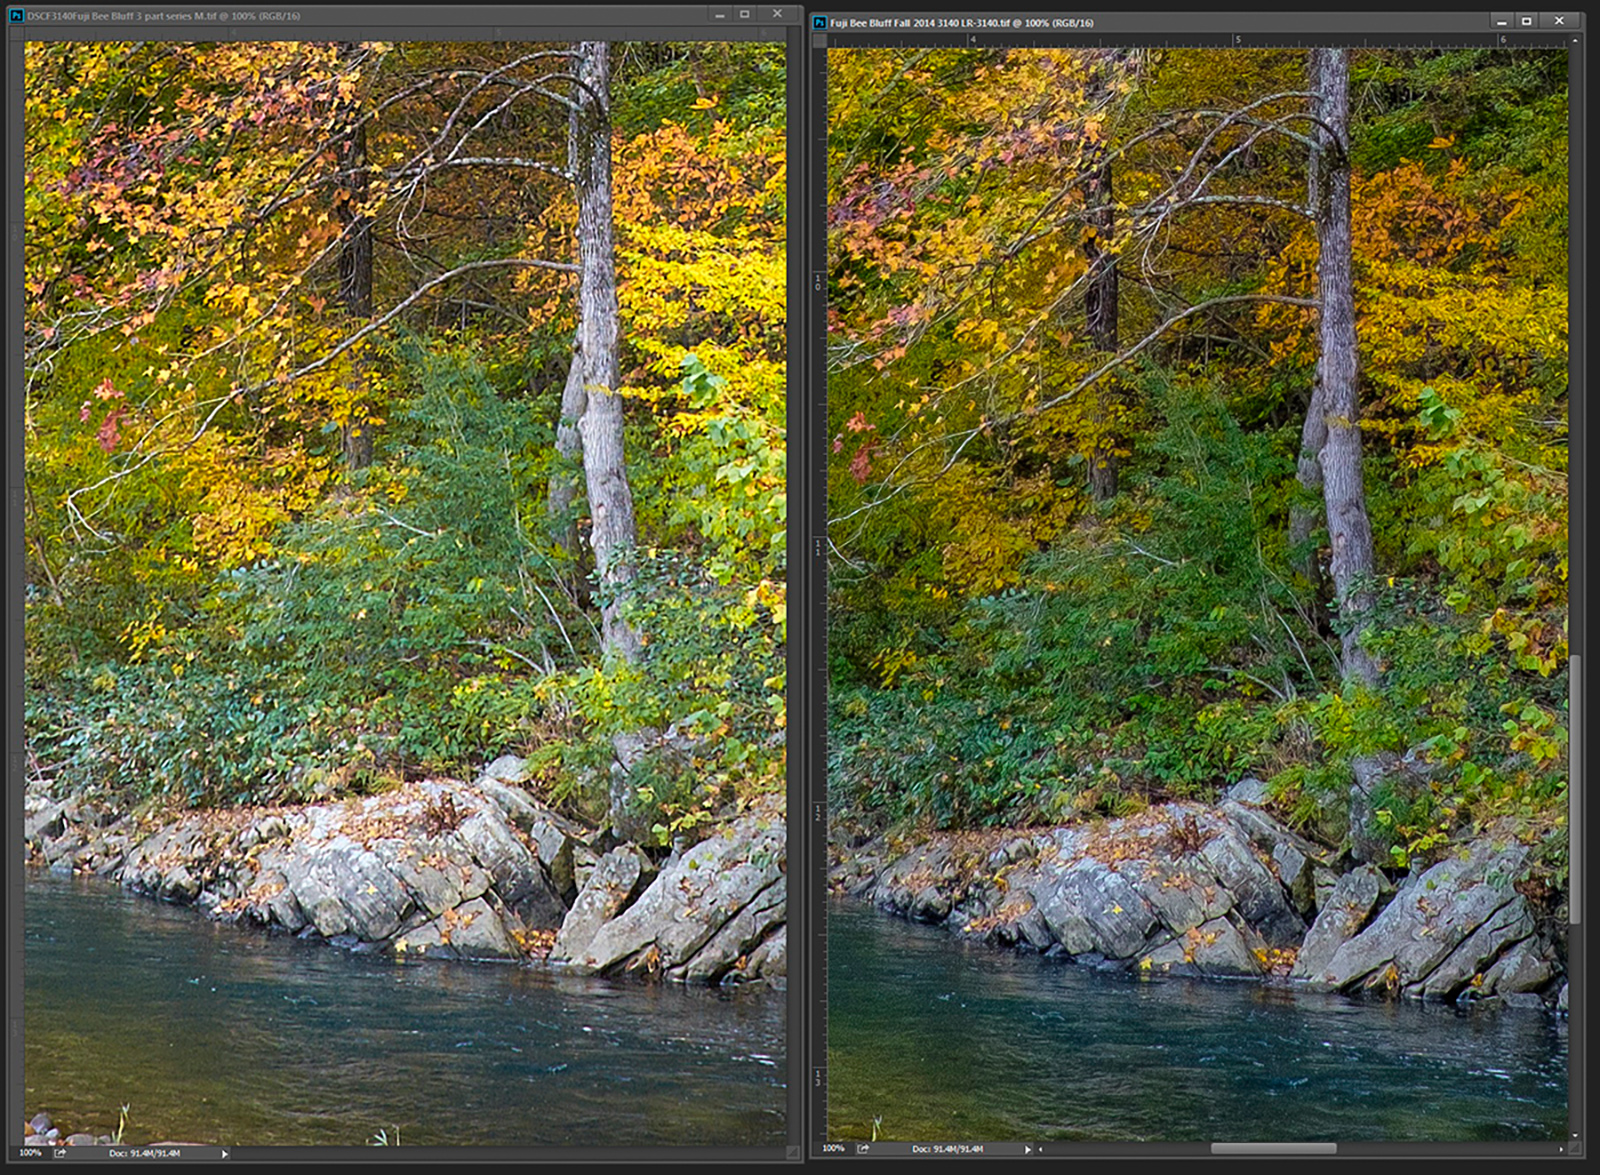
Example no 4, a comparison of C1 and LR on Fuji raw files

NOTE again the greens on the LR image appear overdone. Looking closely at the greens you can see some of the issues that LR has. LR picks up the outer edges a bit too much and when you have a lot of greens then you can start to get a painterly effect if you are not careful with the sharpening settings. I still prefer the LR conversion as overall it appears sharper to me. Also look for the finer details in the shadows as the LR file has more there also. Top left of the crop look for the finer branches in the gun tree, they stand out much better in LR.  Here I found that C1 pulled a more pleasing look to the large rocks in the foreground than LR and LR also has a bit of red showing in the large gum tree trunk.  Both of these issues could be fixed with a slight color balance tweak and a bit of shadow recovery.  The water in the immediate foreground looks pretty much the same.  But again make sure to click on the image to view it larger.  Then compare the green branches on the left side right above the rocks.  There just is more definition on the LR file.  Also look into the yellows just above the already mentioned greens and see if you don’t agree that there is more detail present in the LR image.

Fuji X-Trans raw conversions

Example No 5, a comparison of C1 and LR raw conversions on Fuji X-Trans files

This last crop shows how well LR has improved on pulling out finer details against a blue sky. There is just more there and the areas in shadow right above the bluff look better in the LR conversion. But the strongest example is the yellow gun tree, again this is a view taken at 100% view, there is just more detail in the yellow tree and it’s going to allow for a larger print in follow on.

Let me say, there is not a right answer here. Sometimes I go with LR, others with C1. However I often do hand held panos with the X-T1 and now that LR allows the ability to create a pano in LR and save it as a dng I tend to start in LR first. The ability to work on a pano as a dng to me is invaluable as before you had to try to get all the segments close then export and use a stitching software to combine. Now you can work on the dng as one large image before you export. So far I have been very impressed with what LR can do with a pano on the Fuji Files in outdoor landscape situations.

You can get sharp conversions from LR on Fuji files, and to me the end results look better. But you do have to really control the details and sharpening sliders in LR to get the best look. Is it perfect, no, and I had hoped that LR/Adobe would have a newer process available now since back in June there was such a bit announcement by Adobe about working closer with Fuji on the raw conversion. So far only the fix for haloing on finer details seems to have been done.

Is there a better raw converter for Fuji? Yes I feel that Iridient Developer by far gives the best look to the files especially one like my example, but:

Iridient is MAC only, has a very limited toolset, all adjustments effect 100% of the image (no adjustment brushes or masks at least last time I checked), and Iridient will not export as a DNG, which to me would be a great solution. You can download Iridient for a trial and run conversion tests. The difference is pretty impressive most of the time unless you are working a Macro type of shot.

Just more food for thought.

Paul C

07/02/14 New lens in the Phase One-Schneider LS lineup the 40-80 zoom

About 2 weeks ago, Phase One made a new lens announcement, the LS 40-80 F4 to F5.6 zoom.  This is an all new design, not a reworked Mamiya lens as some of the other LS lenses appear to be (28mm LS, 75-150mmLS, and 80mmLS to name a few). 
You can find some examples of photography taken with this lens at F11 on the Digital Transitions blog.

Schneider LS 40-80 zoom lens

Schneider LS 40-80 zoom lens

In this picture you can get several different views of the lens, it’s not small or light weight.  The outer lens shade is close to the size of the built in shade on the 28mm LS ultra wide angle.  So what do you gain here? I have looked over some early shots taken from this lens at F11 and they look good, corner to corner, however the real test to me would be more wide open or close to it say F5.6. Most of the other wides from Phase One/Schneider (28mm, 35mm, 45mm) are not good performers wide open or even close to wide open.  The 35mm (which is not an LS but sold in the newer D digital name) doesn’t really get very sharp in the corners until F11 either.

Looking at the features besides picking up a short zoom range, that can be covered pretty well by a 45mm D and 55D or the 55mm LS with much less weight and or bulk, I am not sure what the net gain is.  Sure there is the LS (leaf) shutter but unless you are looking for a really fast flash sync, this is not a big advantage, especially in landscape work.  Also, remember that Phase One’s DF and DF+ camera bodes both still fire their internal focal plane shutters when the leaf shutter in the the lens is fired.

Phase One zoom lens

Phase One 40-80mm Zoom lens side view

From this view, you can tell that it’s a well thought out design.  The manual focus ring has the built in clutch, where you can pull the ring down over the “auto focus” wording, and enabling Manual focus.  The lettering and hyperfocal scale is very easy to read, with the usual white letters on black background.  The large hood is detachable and the filter threading is 105mm, yes 105mm it’s big.  You can read all the detailed featured/specifications here: Phase One 40-80mm Zoom.

As a landscape photographer this lens seems to be similar to the older Mamiya 55-110mm zoom a real tried and true lens, in that it has a very limited focal range and is big and heavy.  It weighs 4 lbs!!.  Looking at the lens and knowing what I like to shoot I have a few more detailed thoughts.

  1. Weight, if you attempt to carry this in the field, you will be paying a high price for a very limited zoom range.  This lens at 4.1 pounds weigh just a little less than my entire Arca rm3di, IQ260 and 40mm Rodenstock lens.
  2. Price, well this should be number 1, folks at 9K this lens is very much a specialty unit.  Not sure what the thought process is here from Phase One.  There must be a market but consider that that NEW Rodenstock 40mm lens from Arca, Cambo or Arca will cost about 1/2 of this lens price.  Sure you have to have a tech camera but if you are working with landscape in medium format and want the best wides, a tech camera is pretty much a given.
  3. No tilt or swing.  This is very important to me as I don’t want a shallow DOF for my work.  Phase One even points out that this lens features a “great shallow DOF” (DOF = depth of field).  The advantage of having tilt alone to change my DOF with a tech camera is priceless
  4. Huge outer filter threading of 105mm.  This means very expensive filters as a circular polarizer in the 105mm range will be at least $250.00 (but when you purchase a 9K lens I guess this an additional drop in the bucket)
  5. The 105mm filters are thicker by design and more than likely you will not be able to stack a Neutral density and CL-PL without getting some vignetting at 40mm
  6. Pretty limited aperture range for a 9K lens, at F4 and moving to F5.6 at 80mm
  7. Extremely limited zoom range for 9K only 40mm
  8. No Image stabilization which would be a nice feature for a lens that tops the scales at over 4 pounds
  9. More than likely soft corners at 40mm until you get to around F11 (but to be fair to Phase One, I would need to have the lens and test it)

I would say that this is very specialized purchase and I am overall disappointed to see Phase One continue to price their lens in the upper stratosphere. But this lens has to take the award for most expensive medium format zoom ever made.

Lets take a look at just how much some of these lenses really cost with a similar zoom, the excellent Mamiya 75-150 F4-5.6.  This is zoom which has been on the market for over 4 years or so, first under the Mamiya brand, has always been an expensive lens listing for around 4.6K U.S.  I first looked at this lens about 3 years ago but found the price point just too much, however on ebay there were several examples (new) being sold for $2,500.00, close to half price.  These lenses were being shipped from Japan, but they still had the full Mamiya warranty.  Plus on a lens like this if it works from day one, odds are the lens will continue to work unless you drop it.  So my point is that the 40-80 at 9K, costs much less than this and the price has been totally over inflated for some reason, as if to limit sales.  Trust me not too many photographers are going to line up to purchase this lens for this price.  For 9K, you getting into the cost point of a Nikon or Canon 600 F4 lens.  Yes I understand these are not medium format lenses, but they seem to warrant the price point more to me than this limited range zoom.  Why Phase One choose to price this lens at 2x of the original Mamiya 45-90 AF zoom is pretty disappointing, and is yet another reason I am glad I shed this type of gear over 2 years ago when I moved to a technical camera.

One thing is certain, this is not a re-worked Mamiya lens as some of the other Phase One LS lenses are.  NO, this is all new and a totally different optical design.  Users of Mamiya medium format cameras may be able to remember back about 4 years ago, when the 45-90AF lens was announced. The aperture was a fixed F4.5 and the zoom from 45 to 90 gave it a bit more reach and it  filled a big hole in the Mamiya modern digital zoom range.  The only lens close was the much older designed 55-110 lens.  Optically it was great for film backs, but past 33 megapixels, the optical quality of the lens really started to show.  I owned one and used it for several years, but rarely carried on long hikes, due to the limited zoom range and the weight.

Mamiya zooms 45-90

Older Mamiya 45-90 zoom–NOTICE THE WEIGHT 2LBS

For a while this lens showed up on B&H photo and other camera reseller website, but it never shipped, possibly may never have really existed.  Sure mockups like the image above were made but I never read any reviews from anyone that was able to test and shoot with this lens.  No it did not have a LS shutter but it was still very expensive listing at around 4.5K, but since it fit into such a great spot in the Mamiya zoom line up I was excited about it.  Now you could work in the field with only 3 lenses, the 35mm F3.5, the 45-90 F4.5 zoom and the 75-150mm.  The 35mm suffered on the corners and really wasn’t that great a lens, but the hopes were that the 45mm focal range on the new 45-90 would be good.  This lens quietly just went away, and Dr Frankphase has brought it back as the new 40-80 zoom, at 9K.  wow, that’s all I can say.

As a Phase One user, sadly I find their directions seem to be moving away from mine.  It doesn’t seem to be an attempt at enabling growth just as their upgrade price from a IQ260 to IQ250 was financially unrealistic .  Realistically, sure there are photographers that will buy this lens, but WHY?  Do you just have to have the LS shutter?  And for 9K.  For 9K, it should be darn sharp corner to corner at F5.6.

Before purchasing this lens, I strongly recommend that the photographer with the budget for it (and the physical stamina to carry it all day) demo it on their existing equipment.  You can find demo’s with Phase One authorized dealers like Digital Transitions based out of New York.  They have recently added some new images taken from this lens to their blog.


02/14/14 Why I didn’t purchase a Sony A7r–Thoughts from a Nikon shooter

Sony A7r 36MP sensor view

Sony A7r viewed from the front showing full sized sensor

When Sony Announced the A7r I was very impressed.  In the past Sony has produced some very impressive camera solutions and I was almost moved enough by the A99 DSLR to purchase one.  However my local dealer, Bedford Photo in Little Rock Arkansas, pointed me toward the fact that Sony was working on a full frame Nex style camera.  A camera that was going to revolutionize the market.  It was enough to make me wait a bit.  

It’s now been about 4 months since the initial roll out of the A7 family of cameras.  Sony ended up producing the A7r without a low pass filter at 36MP and the A7 with a low pass filter at 24MP.  Both cameras are mirrorless and were put into a very compact mostly all metal body.  I was in line at Bedford’s when they had their Sony day in late December 2013 and was able to work with an A7r.  My reaction was different as I did not purchase one.  Instead I backed off to evaluate the entire A7r solution and after giving it some consideration, I found for me it did not make much sense.  Here are the main reasons:

  1. Sony FE lens support current and future
  2. Concerns of current Sony Alpha (A) lens support for the A7r
  3. Nikon lens support issues on the A7r
  4. No on Chip image stabilization on the A7r
  5. Concerns with non-Sony lens adapters
  6. Sony history of 1 and done firmware updates
  7. Weight of body with larger lenses
  8. Lack of intelligent remote or intervalometer

Let me give a bit more detail behind each of these.

Sony FE lens support current and future: 

With the new Nex A7r, Sony also announced a new line of Full Frame lenses, the FE lineup.  Currently there are 4 lenses announced with more to come. 

  1. Sony FE 28-70mm F3.5-F5.6
  2. Sony FE 35mm F2.8 (Zeiss optics)
  3. Sony FE 24-70 F2.8 (Zeiss optics)
  4. Sony FE 55 F1.8 (Zeiss optics)

This is a start but only one of these four lenses has OSS (image stabilization).  With a 36MP sensor in such a slim body, there are going to be situations where vibration may cause some overall sharpness issues.  I used the Sony Nex-7 for over 2 years with many of the older E lenses before moving to the Fuji X cameras.  The E mount lenses are mainly plastic bodies and on the Nex-7 they were not the best solution.  Fine for video work, but detailed sharp landscape images, I was not impressed.  It seems that Sony is moving up in overall quality with their newer FE glass, but however these lenses will only work in full mode on a Sony A7 family camera body.  They won’t work on a Alpha body even though they are full frame.  I also don’t see much movement in the ultra wide solution for this camera.  In the field for my work, I most often lead off with a 14mm lens and so far I have not seen anything from Sony showing a platform with a 14mm in the native FE mount.

Concerns of current Sony Alpha (A) lens support for the A7r

With my Sony Nex-7 I used the Sony LA-EA2 adapter which allowed me to have the ability to mount standard Sony Alpha lenses.  This adapter had the translucent mirror technology that Sony uses in the A99.  Of course Sony puts OSS on the sensor on their DSLR bodies which is a great idea.  So all of the Alpha lenses I used would not have any OSS (image stabilization).  The AF with the Sony LA-EA2 adapter was good, a bit slow but most times accurate.  The adapter added a lot of mass to the Nex-7 but with the Alpha 16-80mm lenses it was a good solution.  When I demoed the A7r I used this same adapter and the Sony Alpha 16-80mm lens.  I found that with AF on, almost all of the shots were just a bit out of focus, but when I switched to manual focus and peaking I was able to produce some very sharp images.   AF is important in my work and many times I would prefer to lead with AF instead of a manual focusing option.  My medium format solution is a Arca rm3di which is always manual focus so I when I work with cameras like the Sony A7r, I want a rock solid AF solution. 

Sony also announced a new Alpha lens adapter when they brought the A7r to market, the LAE4.  I was not able to try this adapter to see if it produced more consistent results with AF. 

Nikon lens support issues on the A7r

I should have listed this closer to the top.  With Nikon lenses, there is no current adapter that allows for AF or VR.  This is a huge deal for me since most Nikon lenses really aren’t designed with precision manual focus in mind.  This is especially true with the new G lenses.  It’s possible the the manual focus rings are just not that well calibrated and just a tiny amount of movement can make a major change.  Since Sony did not put any stabilization on the A7 cameras sensor,  you will need to rely on the stabilization in the lens.  Several of Sony’s new FE lenses will have OSS (Sony lens stabilization), however all the Nikon lenses I have with VR, the VR and AF will not work.  This is only true with Nikon lenses, as Metabones makes an adapter for Canon that allows the use of both IS and AF on the Canon lenses.  If I was still heavily invested in Canon lenses, the Sony A7r would make perfect sense especially since Canon has yet to announce any new full frame DSLR with any more than 21MP. 

A view of the Sony A7r showing the tiltable LCD screen

A view of the Sony A7r showing the tiltable LCD screen

No on Chip image stabilization on the A7r

Many users of the A7r are reports issues with vibration from the focal plane shutter on the A7r.  It appears that the A7 has a different shutter design that does not cause this problem.  However depending on the lens and selected shutter speed, the A7r can impart a slight blurring that may or may be able to be recovered in post.  This oversight should have been expected with such a high megapixel count sensor in such a lightweight body.  Some photographers are bothered by this worse than others, depending on the equipment they are using and shutter speed ranges selected.  It’s a bit of a disappointment since Sony has such a good implementation of the sensor based image stabilization on their pro DSLR bodies, like the A99.  I don’t see this being fixed via a firmware update.

Concerns with non-Sony lens adapters

Currently there any many different brands of adapters on the market to allow the use of non-Sony lenses on the A7 family of cameras.  These range from exotic Lecia lenses to more common Canon and Nikon.  The problem with many of these adapters is that they don’t seem to maintain the correct tolerances so that within a brand two of the same adapters may not reach the same degree of focus accuracy.  Also it seems that some of the adapters can create either reflection issues or contrast issues when shift lenses are used.  These issues may be worked out over time, but currently it poses just another problem that may or may not be correctable in post processing.   For example the Metabones adapter for Canon lenses has shown definite problems contrast shifts when any of the Canon TS-E lenses are used, especially the excellent 17mm and 24mm TS-E2 lenses.  Some people are fixing this by gluing a non reflective material inside the adapters, which is not an easy task due to the interior layout of the Metabones adapter. 

Sony history of 1 and done firmware updates

Sony has a history of not releasing any major firmware updates to a camera once it ships, similar to how Nikon operates.  This implies to me a pretty closed system and is unlike Fuji, Canon or Phase One.  An example of this is the Sony Nex-7 which was shipped in early 2012.  This camera had a huge issue for most shooter, myself included, where the video button was just too easy to engage while shooting stills.  It took Sony at least 9 months to release a firmware to allow the user to change the button from always on.  Sony seems not to release firmware updates that have any effect on image quality.  The Nex-7 was a great camera in the ISO range of 100 to 400, however after than the amount of noise that developed became destructive to the image and by ISO 1600, the files were so noisy to make them only equivalent to 16MP images.  I had hoped that Sony would add some firmware enhancements that would allow for some improvements on the higher ISO ranges for the Nex-7, but it never happened.  Canon and Fuji both have had several major firmware enhancements to several of their camera lines that allowed for major improvements in image quality.  I like to see a company continue to develop a camera’s capabilities after the initial announcement, and this is not a practice of Sony.

Weight of body with larger lenses

The body of the Sony A7r is so light that most modern 35mm lenses seem to unbalance it.  If you are only using a older prime lens this might not pose much of a problem, but try placing the Nikon 14-24 on the A7r!.  The weight of the lens totally outweighs the camera’s small mass and it makes it pretty much impossible to just shoot by holding the camera.  So both hands are occupied in holding the lens/camera and you really don’t have a free hand to switch a setting once you are lined up for a shot.  If you are using the camera/lens combination on a tripod, then most definitively the lens will need a tripod mount (which none of the current FE lenses do) or the lens adapter (like a Metabones or Novoflex) will also need a tripod foot.  The lens mount flange on the Sony A7r cannot handle the sheer mass of many of the lenses you might want to use and long term you will either bend the flange or pull it out of alignment.  Either way the fix will be out of warranty and depending on how the mount flange is installed may or may not require an entirely new A7r body.

Lack of intelligent intervalometer for A7r

As with all Sony DSLR’s and Nex cameras, there is no intervalometer for this camera.  Sony once again is depending on a app called Timelaspe that will run on the iOS or Android OS.  This tool limits you to the power left on your phone and since it requires the phone to be on for an extended period of time, it will drain the phone’s battery.  The timelaspe app is designed to give the user the ability to create the actual video on the camera so for the night photographic use I would need it’s not a tool I could use.  I much would prefer to use a cabled intervalometer that will let me set the time of the necessary exposure and the interval needed, removing all of this from the camera.  I have also not found any built in timelaspe tool that will let you take a shot longer than 30 seconds since they all are dependent on the camera’s built in set shutter speed of 30 seconds.  This is the longest shutter speed that most cameras will allow.  Sony once again has used their proprietary port for a wired remote so that none of the third party intervalometers will work.  This limits tremendously the use of the camera in night photographic applications and even limits it in the more traditional timelaspe applications.  Personally I don’t want to be tied to my iPhone for any type of intervalometer use.  The amount of heat that may build up in the Sony A7r may preclude it from night photographic operations anyway.

The Sony A7r is a great concept and for many photographers, it’s a great way to reach the 36MP threshold, especially a Canon shooter.  In my situation, I already have the Nikon D800 and find it’s mass/weight are a benefit in keeping everything in sharp focus.  I love the idea of a EVF that allows 100% magnification at the viewfinder level like Sony has along with the excellent focus peaking that Sony has had for several generations of DSLRs and Nex series cameras.  However the inability to use my current lineup of Nikon lenses (with AF and VR) is a huge issue for me.   This is a first round release for Sony and no doubt they will follow up with a more refined product either later this year or early 2015.  I can also hope that Nikon improved their Nikon1 lineup of mirror-less camera to include either the Sony 24MP or 36MP sensors as then I should be able to use all of my excellent Nikkor lenses to their best capabilities.

08/02/13 New article on strange sensor behavior with D800 and night photographic work

Possible reticulation results with D800 and night photography

Possible reticulation results with D800 and night photography–Click on image for a larger view

I have written a brief article on a problem I had with my Nikon D800e on a night shoot back in May of 2013.  You can read the detailed article here:

Back in May of 2013 on a night shoot, I noticed a strange problem with my D800e images.  I was shooting for night star trails and using the stacking method of shooting.  Normally this will help reduce overall noise since the sensor does not have to stay on for a single long period.  On this night I was working a 1 minute 50 second stack series of images and when I previewed the files on the D800, I immediately noticed a large number of small white dots.  These were not from planes or any other man made device, and were very random through the image, very similar to how noise will look.

In post I found that Lightroom 4.4 had definitely more trouble when working with the raw files.  I did not take any jpgs during this shoot.  I also learned that Capture One Vr. 7, Phase One’s raw conversion software did a much better job overall of the files.  I was able to correct for all the small dots in Capture One, but never really was able to get all of them taken care of in Lightroom.

My D800e is a standard setup, with the Nikon Grip.  I have 1 Nikon Li-0n battery in the camera and the the grip has (8) Ni-MH batteries installed.  I have not had any issues before with this setup.  I will always run off the batteries in the grip first and then the battery in the camera.  Most times in about 4 hours of constant shooting and checking exposures, I will go through all of the power in the grip cells and then use up about 1/3 of the Li-on cell in the camera.  This particular night was not that hot, ambient temperatures were about 78 degrees and the humidity was low about 30 percent of less.  I have not had a chance to do another night shoot since the one in May but hope to get out soon and see if this is going to be a constant problem or a  one time occurrence.

06/15/13 Phase One failures using Silver vs Black batteries

Silver vs Black Phase One 7.2 volt Lithium Ion Batteries

Silver vs Black Phase One 7.2 volt Lithium Ion Batteries

As many Phase One users may know the main battery used in most modern Phase One Digital backs, is based on a Canon Video camera battery.  In fact in the older Phase One cameras which had the battery external to the back, like the P45+, P65+ etc. you could use Canon’s AC adapter/battery setup on Phase One cameras which gave you a much longer life in the field.  This all ended however when Phase One decided to place the batteries inside the case as in the newer IQ series of backs.

One issue I have had with all Phase One batteries, is that they don’t’ tend to last very long in the field.  The older batteries were 2600 millamp hours and in most cases with a IQ160 I would get about 2 hours or less in the field.  When Phase One announced the IQ backs, they also increased the millamp rating on their batteries to 2900.  In a nutshell millamps tells you how long a battery will last at charge i.e. 2600 will last a shorter period of time than 2900.  However as I also moved to a tech camera setup with my IQ 160, I found that my battery use increased considerably.  Since the IQ backs don’t really have a very good live view I tend to do a considerable amount of checking after a series of shots.  In the past 6 months, I have found that some of this review is no longer necessary as I have gotten much more confident with my tech camera and focus.  The ultimate solution is still a better live view but as long as Phase uses CCD technology, I have been told this will not happen.

So what do you do when you know you will be in the field all day or maybe two or three days?  You carry a bunch of batteries.  About the time I was introduced to the Phase One IQ series of digital backs, I also discovered that there was a much cheaper battery alternative.  Ebay and some U.S. Phase One dealers sell a silver battery which looks and feels just like the black Phase One branded cells.  They are all 2600 millamp but at 1/2 the price.  My thoughts were  to just purchase more of the silver cells and then carry them on trips.  They don’t weight that much and charged up with the same Phase One charger.  In fact I designed a battery sleeve that I could carry over my shoulder, based on a hunters belt.  The Phase One batteries will fit into the same size as a 12 gauge shotgun shell!

At first, I really noticed no differences and pretty much stopped using my older Phase One LI batteries.  Lithium cells in theory should not have a “battery life” issue but I noticed that my batteries that dated back to 2008 and 2009 where definitely getting shorter run times.  There is no way to “re-condition” a lithium cell like you can with Ni-Mh cells.  However in early 2013 I started to notice some strange issues with the Silver batteries, on my IQ160.

I had been shooting with the Arca rm3di, with various lenses, for about 1 hour.  The battery installed was starting to get low, not blinking yet.  In the past I have seen an error where the camera will tell me “no storage available” when I have plenty of room on the card left, and that has que’d me into looking at the battery level.
 On this day, I got that same error, looked and the battery indicator was on the last indicator.  So I powered off the back, and replaced the battery.  Here is where the strange behavior starts.
  1. The first silver battery I installed, did not power the back up.  I double checked that it had locked and it did.  This battery had come straight from the Phase charger, and showed 100%, one of the silver batteries.    I went back and pulled the 2nd silver battery from the charger, which also showed 100%
  2. The 2nd fully charged silver battery did power up the back.  All seemed fine so I continued to shoot.  However after each shot, I noticed that the battery indicator would drop from full, to 1/2, to the lowest indicator while the back was writing the file.  As soon as the file was finished writing the battery indicator would return to 100%.
  3. When I attempted to zoom to 100%, the zoom went to over 200% and locked.  I could not go back down to normal view with a double tap.  I had to power off and power back on.  This series of errors happen several times, then I noticed on the right side, where the histogram should be there was nothing even though I could double tap the histogram to view it at 100% and then it showed up. Also both focus mask and the highlight warning would not engage when tapped.
This all went on for about 5 minutes as I tried to work the back.  I finally took out the 8GB scan disk ultra card and tried a different card, but the same things happened.  In frustration, I powered off, went back and pulled yet a 3rd battery this time a black Phase One cell, which had been charged up a couple of days’ ago.  This time all the functions came back and the back seemed to work correctly.
All of this strange activity happened in about 20 minutes, the outdoor temperature was about 92 degrees and I was working in the sun.  I finished up the testing with the black Phase One cell, but contacted my dealer Digital Transitions on Monday about the problems.  I was concerned that something might be going wrong with the back and it needed to be sent off to Phase One.  Digital Transitions took a different tack and asked me to try out the back in the same conditions but only to use the black Phase One cells, which I did, in fact  on 3 separate shoots total hours 12 to 14.  No problems and no repeats except  for the low storage warning when the Phase One cells shows low.  NO other problems which was a relief.
All of this strange activity happened in about 20 minutes, the outdoor temperature was about 92 degrees and I was working in the sun.  I finished up the testing with the black Phase One cell, but contacted my dealer  Digital Transitions  on Monday about the problems.  I was concerned that something might be going wrong with the back and it needed to be sent off to Phase One.  Digital Transitions took a different tack and asked me to try out the back in the same conditions but only to use the black Phase One cells, which I did, in fact  on 3 separate shoots total hours of back usage 8 to 10 hours.  No problems and no repeats except  for the low storage warning when the Phase One battery indicator shows low.  NO other problems which was a relief.
Silver vs Black Phase One 7.2 volt batteries no 2

Silver vs Black Phase One 7.2 volt batteries no 2

Out of curiosity I went back to the silver cells and worked with them in the IQ160.  I had two of them that had been in my pack which had been sitting in the sun.  The batteries were at 100% full charge, and when I placed one of them in the IQ160, I noticed that it was not fully engaging the brackets that hold the battery in place.  When a new battery is placed in the IQ160 back (or older P series backs) the back always powers up.  What happened when I placed the silver battery inside was that the back powered up, briefly then the screen went blank and the back powered off.  I double checked that the battery was still locked into place and it was.  However even locked in place you could still move the battery around and as I did this the back powered back on again.  It seems that over time the outer casing material of the silver batteries, may expand, and contract and as it contracts it slightly deforms the shape of the battery enough that the slot where the battery fits on the IQ160 does not hold the battery firmly.  I have also had several silver batteries that did not want to come out of the back after they were used.  I first noticed this about 6 months ago, on silver batteries I had been using for about 8 months.  This behavior implies that as the silver battery is used it gets hot (normal for a LI battery during discharge) but the silver case is also expanding and contracting causing deformations.  Over time these deformations can cause the silver batteries to either:

  1. Stick inside the IQ back, and become very hard to remove
  2. Not fit snug enough in the case and allow movement which will either not give the correct voltage to the back and cause errors.

With the older P series backs where the battery is external to the back, this issue is moot since the battery is held in place by a hard metal sleeve and it can’t slide around.

I have not noticed any cracks in the silver batteries, but as a safety measure, I have stopped using them.  I would not have any issues using them on a older P series back however like  P45+.

These are the results of one person’s usage of a IQ160 and the silver batteries that are sold to replace the standard black Phase One cells.  If you have using these silver batteries and are experiencing any of these issues, before you send your IQ off to Phase One, try working only with the black Phase One batteries and see if your problems persist.

06/07/13 Phase One starts to ship IQ260 units to both dealers and customers

Phase One IQ260 Medium Format Digital Back

Phase One IQ260 Medium Format Digital Back


It looks like Phase One has started to ship the IQ260 Medium format digital backs to some customers and dealers.  U.S. dealers will be receving a back for demo purposes and it also seems that some customers, mainly overseas have already received a production version of the IQ260.  It’s my understanding that with Capture One version 7.1.1 and up,  the new IQ2xx backs are supported for raw conversion and tethered support.  The production firmware that comes with the IQ260 will support USB3 for tethered capture.  This same firmware or a variant will also support USB3 tethered support for the older IQ140, 160 and 180, which is a real kudo for Phase One.

Currently I am working with the largest U.S. dealer for Phase One, Digital Transitions, based out of New York.  I have had a upgrade on order from my IQ160 to a 260 since the announcement.   I have owned my IQ160 since December of 2011 and it’s been a excellent digital back.  I made the transition to a Arca rm3di tech camera at the same time and the two products have allowed for excellent photographic results.  With the announcement of the IQ260, I was very concerned about the residua value of my 160.  Phase One dropped the list price of the IQ160 by 3K U.S. the same time they announced the IQ260.  Some of the extra features of the IQ260:

  1. Long exposures up to one hour in length
  2. Increase in  dynamic range over the IQ160
  3. Wifi support for viewing captures on remote devices like ipad, iphone etc.
  4. Fully supported USB3 tethering

As I don’t shoot in a tethered environment, I was not too concerned about  USB3, however the fact that Phase One now has USB3  working on the 260 and will have it working on the older IQ’s is good.  Long exposures up to 1 hour in length which brings the 260 up to the relm of the P45+ is good for many shooters, but for my night work, I really don’t need it.  It would be nice to be able to take some longer daylight exposures up to 3 to 4 minutes which the new 260 will easily allow and is beyond the exposure range of the 160 or 180.  However I was much more interested in the improvements to dynamic range.  This one subject has been glanced over in the press and user forums, but I feel strongly that it’s possibly one of the key improvements.

Since the announcement of the Nikon D800 family of cameras, there have been tons of comparisons between medium format digital and 35mm digital.  I have owned a Nikon D800 since April of 2012 and have found it to be an excellent addition to my photographic tools.  However I still prefer the look of the work I produce on the IQ160.  One asset that the Nikon D800 has is it’s ability to produce very clean files in the iso ranges of 100 to 400.  There is a huge improvement here from any 35mm DSLR that I have shot, and this included most of the current Canon line up and all of the Nikon line up.  With the Nikon D800, you can push a file shot at iso 50 easily as much as 2.5 stops and possibly as much as 3.5 depending on the shot.  You have the ability to pull up shadows from parts of the image that are basically close to black.  With the higher iso ranges of 200 and 400, you don’t have as much leeway with pullup with shadows and noise, but you can still take a very clean exposure in the iso ranges of 200 and 400.  So in landscape shooting situations where I need a faster shutter speed to stop motion, with the Nikon D800, I have no reservations of moving to iso 400 and shutter speeds of 1/250 and 1/500.

The current IQ160 produces very clean files at it’s base iso of 50.  In fact I have often found that I can push the shadows up as much as 2 stops when working with Capture One.  However in many cases it may be a better solution to push the highlights at time of exposure which gives more room to the shadows.  Often as not, you can recover the highlights, something that was not so easy with the P45+.   However there are times in the field where you need to be shooting at iso 200 and even 400.  This occurs with windy situations when the tree movement will just be too extreme if shot at the base iso of 50.  Also since I am using a tech camera, with a manual copal shutter, I don’t have the advantages of a a fully electronic shutter which allows for a wider range of exposure settings.  The copal shutter is fixed at 1, 1/2, 1/4, 1/8, 1/15, 1/30, 1/60th, 1/125th, 1/250th, and 1/500.  You can’t get the full range that all modern DSLR’s and medium format bodies give, like 1/45th, or 1/3 of a sec. etc.

When you move the iso on the IQ160 up to 200, you will start to find some limitations of the Dalsa chip, especially when you start to limit the light with exposures like 1/30th and 1/60th of a sec.  At these faster shutter speeds and at iso 200, you will start to catch considerable noise in the shadows enough that you can’t pull them up at all, and even a bit of color/saturation fall off.  If you go up to iso 400, this issue gets much worse, enough that shooting at the shutter speeds of 1/30 and 1/60 become too noisy in most situations.

I am hoping to find that the IQ260 will alleviate some of these concerns, in fact these are the 3 areas I am most interested in seeing a comparison of.

1.  Color/look etc.  I am just wanting to make sure the color clarity of the 260 will be similar to the 160.  I realize that the P65+ and 160 use the same Dalsa chip  and after working with the 160 for 6 months, I only wish I had moved from the P45+ sooner.  I personally love the look of the 160 files at iso 50 and hope to see a similar richness in the 260 images.  This one issue to me is probably the most important.  The 260 is a new chip not the tweaked 180 to 280.  I realize this requires possibly a side by side shoot and this might not be possible.  I don’t care if the camera used is tech or Phase One DF, realizing that the DF would allow for faster shooting.

2.  Range of iso50 on the 260.  Is it the same as the 160, or will there be a slight improvement from the 160 to 260.  Hoping to see the ability to pull up shadows better on the 260, when exposing for the highlights.

3.  iso 200 and 400.  How do they compare to iso 200 and 400 on the IQ160.  Does the 260 have better performance with iso 200 and 400 at base settings, or do you have to go to the long exposure mode base iso 140.  If forced to go there, is there a loss of details at 200 and 400.  There are many times where I need iso 200 to get to a shutter speed of 1/60 or 1/125th, and 400 would be even better.  This is to stop wind blur on leaves when shooting water scenes.   Also do color and clarity start to fall off with these new “enhanced” iso settings.

I have done limited work with the 160 and sensor plus.  What I have seen is that sensor plus does do a better job in medium to low lighting situations where I need a faster shutter speed.  It holds very good color clarity and saturation and very low noise.  For iso 200 in regular mode you will usually have the same clarity and sat, but much more noise.  With sensor plus I still get caught up in the 15mp vs 60mp. and final print size. I have worked up a few prints form 15mp Sensor plus shots and they do look good, and with a good uprez tool I feel you can get 2x to 2.5 the size OK, but still not close to the 60mp base output of the IQ160.  This for a while had me thinking that the 180 may be a better upgrade as it’s sensor plus mode gives the photographer 20mp output.
In my work, I will most times have a CL-PL and ND 9 or 6 on to allow me to get to the slower shutter speeds I need.  Getting the exposure correct can be harder since it’s easy to get shadows to go too dark when trying not to over expose the water.  So any improvement from the IQ260 that give a bit more room in these situations will be a welcome addition.  I am hoping to get some sample files from Digital Transitions in the next week or so, to help solidify my decision on whether or not to upgrade.


05/19/13 Close but no cigar–Really Right Stuff 5D MKII L bracket fitting to Canon 6D

RRS L bracket for Canon 5D MKII

RRS L bracket for Canon 5D MKII

Canon 6D vertical grip release and RRS (Really Right Stuff – Company) 5D MKII L bracket interference ball head from them over 10 years ago.  Really Right Stuff makes hundreds of different types of camera accessories, but one of the number one items they make is the L bracket.   The basic L bracket is a great tool for any camera since it allows a user to rotate the camera from the landscape or horizontal position to the portrait or vertical position without having to lower the entire head assembly into the drop outs of the tripod head.  This saves a tremendous about of time since the user won’t have to re-level the camera or line it back up with the subject matter.  I have been a user of various L brackets since my 1st Nikon D1x and as I moved to Canon DSLR”s I quickly adopted L brackets for those cameras also.  The one issue that tends to come up is that most times you can’t mount the L bracket from one DSLR design to a new camera.  This is because the width of the base of the camera may be different or the location of critical ports may have moved.  If your camera has a grip option you will have to determine if you want the grip installed and buy the L bracket for the camera with the grip mounted.   I always use the vertical grip with my Nikon or Canon cameras since it gives you a greater battery capacity and tends to balance out the camera.

When I purchased my 6D and old off my last 5D MKII I still had one of the RRS L brackets that I had not sold.  I was hoping that I could just mount the L bracket to the 6D.  On initial inspection it looked like I was in luck.  The L bracket easily lined up with the base screw and had a good fit across the width of the base.  It stuck out just a bit, but that was not a big concern for me.  I was also able to get access to all of the covered ports on the left side of the 6D.  As you can see in the pictures below, the fit was very good.

The feel and fit were perfect and at first I was pretty happy with the way the RRS L bracket had taken to the 6D.  However  I quickly realized that there was one issue.  Canon changed out on the 6D grip how the user opens the battery compartment.  Instead of the back door folding down as the way it worked on the 5D MKII, Canon switched to a more conventional setup.  Now the battery compartment slides out from the side, like how the batteries mount into the pro bodies like the Canon 1ds MKIII.  This causes a bit of a problem since the battery door will no longer open.  As you can see in the images below the hard frame rail of the L bracket blocks the door.

Everything other feature of the 6D works great, but you will have some problems with the batteries.  Since the design of the Canon vertical grips requires all the camera batteries to be carried in the grip, it means that you will have to remove the L bracket each time you charge the batteries.  This is of course a bit of a pain and makes the use the 5D MKII L bracket on the 6D not a good solution long term.  I am still using it on my 6D as I only use the Canon DSLR for night photography and thus it’s not my prime landscape camera.  I can charge up the 2 batteries before a night shoot and with 2 batteries installed, a 6D will last all night long.   Long term I will eventually break down and purchase the RRS L bracket for the 6D, but it’s not on my list of most urgent needs right now.

You can get by with this solution, just make sure you carry with you the necessary allen wrench that lets you release the L bracket from the body of the 6D.

04/11/13 My thoughts on the Phase One Investment Protection Policy

New Phase One IQ2X Medium Format Digital Backs

Phase One is the company that produces one of the largest lines of medium format digital backs.  They were pioneers in the production of Medium format digital products from the first scanning backs to their newest lineup the IQ series of backs.   One of the marketing tools that Phase One uses is the “investment protection policy”, in a nutshell:  From the Phase One website.

The program is simple

  • Phase One / Schneider Kreuznach lens purchase is protected for 50% of original purchase price for 12 months*
  • Phase One camera body purchase is protected for 50% of original purchase price for 12 months*
  • Phase One digital back purchase is protected for 90% of original purchase price for 12 months*
Until about 6 days ago, the period of time for the digital back  “investment protection” was 18 months instead of 12.  Just recently Phase One changed this time frame and shortened it by 6 months.  I was surprised to find out that both of the dealer contacts I work with were not aware of this change.  The change of time frame concerned me since I am considering yet another upgrade, this time to the IQ260.  Depending on you interpret the “original purchase price”, I would have qualified  90% of the original purchase price of my IQ160 towards a IQ260.  The real question here is,  what is the purchase price? [Read more…]

04/05/13 Nikon posts new Firmware for the D800 and D800e

I noticed from reading some of the forums that Nikon has released a new firmware for the D800 family of DSLR cameras.  When Nikon brought out the first upgrade for the D800e I did not upgrade.  My camera was working fine and I did not see any improvements to areas that might effect my style of photography.  However this time, I went ahead and bit the bullet.  You can download the firmware upgrade here.

I used a older 2GB card to do the upgrade, the actual file is rather large as far as firmware goes, at 16K.   Nikon recommends you use a card that is formatted in the camera first and do not put the firmware in a folder.  NOTE,  when you format the card in camera, it creates a folder on the card, make sure you go back delete that folder, and just place the firmware which is a .bin file on the main drive letter for the card.  I used a compact flash card not a SD card for the upgrade.

If you have the Nikon or other branded grip installed using a NiMH battery, then you will have to remove it before the upgrade will install.  The actual installation takes about 2 to 3 minutes and Nikon gives you a nice information bar across the top of the screen.

From reading other reports of users who have upgraded it does seem to effect the way Live view is viewed at 100%, and for me any improvement on that is great!  The current implementation is pretty terrible.  I have never been able to tell anything from the image when viewed at 100% and always have to back off 3 steps of magnification.  This is true also for image preview.  I was hoping that the same fix might apply here too.

I noticed no problems after the install.


04/03/13 How to get a better grip on a Arca rm3di– Arca Grip extension

Grip extension for Arca rm3di

Grip extension for Arca rm3di

I have written a short article describing the advantages of using the grip extension for the Arca rm3di technical camera.  I have used the rm3di now for over 1 year and have the grip extension installed on my camera.  The extension is a one piece part made from the same material as the rm3di.  It can be installed in about 5 minutes and once installed it give the photographer a much more secure grip.  The stock amber/yellow handles are nice but they make a flush fit and don’t allow for the ability to get your fingers involved in the grip.  The extension adds about 1.4 inches of extra height.  It  is angled back away from the lens which frees up more room for your hand.  The stock amber/yellow handle then just screws back on top.  Acra gives you all the parts needed to attach the extension.  You can read more about it here, Arca Swiss Grip Extension.

03/23/13 Copal no longer to be in the manual leaf shutter business–possible bad news for Tech Camera users

On the Luminous Landscape website, I ran across a posting about Copal and the possibility that they will no longer be manufacturing leaf shutters.  Copal is a large company and appears to still be involved with many other aspects of electronics and cameras.  The leaf shutter that is in question, is commonly called a Copal Shutter 0.  This shutter is a leaf design and manually operated.  The main area for the use of this type of shutter is with large format cameras (view cameras), and the emerging tech camera market.  All of the lenses that are made by Rodenstock and Schneider use this type of shutter.

Copal shutter mounted to a Rodenstock 28mm HR lens

Copal shutter mounted to a Rodenstock 28mm HR lens

The Copal shutter like the one shown in the picture above is a very critical component to a tech camera solution as currently Rodenstock and Schneider both don’t make a shutter.  The shutter is placed in between the lens elements during the manufacturing process of the lens.This type of shutter is called a “leaf” shutter and is totally independent of the camera body.  The leaf shutter is fired by a manual cable release that screws into to the shutter.    I have never seen a Rodenstock or Schneider  lens that is sold without a leaf shutter installed.  The process of placing the shutter in the lens, should be done by the lens manufacturer to ensure the optics maintain the best alignment.

For out of warranty repair I know of only one location in the U.S that can work on a lens like this is Precision Camera Works, in Niles IL.  They are specialists in the entire Arca line of cameras and also can work on a lens like the Rodenstock 28mm with a Copal Shutter installed.  Outside of this you would have to contact the lens manufactures to see how they would handle a repair.   Of course Precision Camera works is a non-warranty type of service, but they might be able to save a shutter that has broken or has become misaligned in the camera lens.

Copal Shutter mounted on a Rodenstock 28mm HR lens

Copal Shutter mounted on a Rodenstock 28mm HR lens

As this issue starts to hit the various large format camera forums, I am going to try and get a better handle on just what the scope of this announcement will mean.   Currently I don’t know of any other solution other than the Copal shutter for all of these lenses.  I have seen old Nikon large format lenses with a Nikon leaf shutter, however I have been told that this type of shutter was actually made by Copal.  Copal has a electronic shutter that can be used on these lenses, but it requires power and it has a very limited shutter speed range.  I don’t feel that this type of shutter will work in the field.

For now Copal really is it and I am going to try and find a used Copal 0 and keep it as a spare.  I noticed that B&H photo is out of stock of these currently, and plans to get more in sometime in early April.  I am also going to call Schneider in NY some time soon to see what their solution will be since without a leaf shutter, Schneider and Rodenstock both will not be able to produce a workable lens. I am hopeful that Copal may revisit this issue and continue to make this style of shutter, but it also shows just how few of the Schnieder and Rodenstock lenses are being sold currently.

I emailed some questions about this issue with Copal to Rod Klukas, the U.S. Arca Rep.  Rod is much closer to this type of concern since he is talking to Schneider, Rodenstock and other similar companies on a daily basis.  Here is Rod’s answer and it does illivate some of my immediate concerns, but I am still going to purchase a spare Copal in the near future.

“Currently, Rodenstock is still refining their Electronic shutter, though it is hard to use on recessed board-actually impossible and has a
top shutter speed of only 125.  Unacceptable to many portrait fashion shooters.  
Schneider has the SES, which is not so portable so great for studio but…   I believe they are working with Mamiya on a replacement mechanical shutter using some parts of the current Mamiya shutters in the LS lenses on the Mamiya/Schneider lenses.
The HartBlei is really not very precise.
There are some others working on things right now as well.
 
Copal is currently manufacturing what they say is a 2 year plus supply, by the end of the year, when they will stop.  So there should be at least a year or so of shutters.  And by then some of these new shutters should be available.”

Here is a link to the post on the  Luminous Landscape forum.

03/15/13 Interesting Feedback on the new Phase One IQ2X Digital Backs

Phase One IQ260 and IQ280 Digital Backs

Phase One IQ260 and IQ280 Digital Backs


After following some of the more prominent web forums it has been interesting to see how the feedback on the new Phase One IQ2X backs has filtered down.  I have watched the frenzy from the first day back on the 4th of March drop to more of an even pace.  The reactions have been mixed to say the least.  For sure the greatest single comment has been why Phase One did not implement CMOS and come out with a more useable form of live view.  This is true across the entire lineup.  But as you filter down to the 260, 280 and Achromatic  back, opinions seem to vary.

IQ260:

  1. The biggest interest  has been over long exposures again coming to a current MFD digital back.  I have already written a lot about my thoughts on this, and you can read them in this post.   Net it seems that many people are still fascinated by the ability to have a MFD digital back that will reach 1 hour in a continuous exposure.  I am not, at least for my current photographic needs.  I am still much more interested in how much improvement is at base iso 50 if any.
  2. Can the noise coefficient at base iso 50 be improved over the current IQ160.  I feel this a huge issue.  Nikon has proven it can easily get 3 stops of DR at the base iso of 100.  I don’t know of any other current Digital camera that can do this.  It’s really amazing as just how much you can push the shadows and still get a useable image.  Many seem to feel that the IQ180 can do this also.  I strongly disagree as even at it’s base iso of 35, I found more noise in the shadows of image when pushed, considerably more than the IQ160 at iso50. The IQ260 is a new chip and I am hoping all new controller cards, thus hopefully the DR at the base iso can be improved maybe as much as 1 to 1 1/2 stops.  
  3. What will the IQ260 allow for it’s longest exposure at base iso of 50.  Currently the IQ160 is rated to about 30 seconds.  I have taken mine to 45 seconds at iso 50, but that is a real push.  I am hoping that photographers will be able to get up to 2 minutes at iso 50 before things get out of control
  4. I am surprised that more photographers are not concerned about the hit that their current IQ160’s just took on residual value.  NET, there is not point in the purchase of a new IQ160 and used ones will start to fall in value as soon as the IQ260’s start to ship.  I feel this will start to max out in about 8 months from the first ship in June.  There will be folks out using a P65+ that may want to upgrade to the IQ160 instead of the IQ260, but I feel that is a big waste of money.  The chips in the P65+ and IQ160 are the same, so the only gain you get is the new IQ interface.  It’s pretty hard to justify the upgrade cost from the P65+ to the IQ160 just for this interface.  On the other hand it does make very good sense to upgrade from a P65+ to a IQ260.  You have the IQ interface and an all new chip set.
  5. What will the IQ260 do the value of the P45+?  More than likely it will increase in value as the hurdle to get to a IQ260 is much higher in most cases than a use P45+.  But used P45+’s carry some possible baggage. 
  6. There has been a lot of good talk about the WiFi abilities  of the IQ260.  My opinion on that is still out.  Personally, I am not going to try to communicate to a ipad or Macbook air in the field.  Just adds more to carry.   You can’t begin to transfer a full raw file and if you could to a ipad? What good is that.  To a Macbook air maybe you work on the file but unless you own the most current generation of Macbook air, you can only get to 4GB of ram and that is nowhere enough to process out a IQ back file from any camera.   Does wifi for preview make any sense maybe.  You will have a larger screen with a ipad or ipad mini, but it’s still a step away from the camera to review the file and then come back to delete it.  Studio shooters have a different set of needs.  I can assure you that in the outdoors on the normal day, the screen of a ipad or Macbook Air will be just as hard to see as the screen on the IQ260, basically next to impossible.  I have not read about any capabilities to control a DF camera via wifi.  That might be interesting.

IQ280:

  1. Basically there seems to be no interest in the IQ280 from current IQ180 users.  I can understand this as it’s the same chip tweaked to get 1/2 a stop of DR.   IThis might help the IQ280 in shadows with noise.  Phase One did not offer a very aggressive deal to IQ180 owners to make the move.   Also their current IQ180’s won’t take as near a residual hit since the chipset is same, just with newer features like wifi.  That is a stretch for the price of the upgrade.
  2. New buyers considering a IQ180, more than likely will just move over to the IQ280. 
  3. There has been no mention of upgrades to the Leaf Credo lineup of backs so for now it seem that all the new features will only come with the IQ2X backs.
  4. Since the IQ280 has the same 80-MP chip set it will have the same issues with certain tech camera lenses, namely the Schneider wides of 28mm, 35mm and 43mm. 
  5. Many also seem to feel that Phase One will be coming soon with a CMOS 80mp solution.  They might be but I not found any reference to any chip maker and a 80mp CMOS solution in the MFD size.  Not to say one it not out there and Phase is coming out with it.   However I still feel that if and when this happens it will 36mp to 45mp first and then the next generation will move to the 60MP and up sizes.

Achromatic Back

There has been a lot of talk about this back but in reality at the price point you have to be pretty much a dedicated black and white shooter to justify one.  I realize that it will have some amazing resolution at 60mp since there will be no color interpolation being done.  But the software conversions that are out there now such as Silver Efex pro or just the conversions that can be done in Capture One or Lightroom, make this a very expensive back indeed.


For now I am moving forward with plans to purchase a upgrade to the IQ260.  I have yet to really see any files that represent my style of photography.  If I don’t see a difference in the shadows of a base iso 50 file when pushed 2 to 2.5 stops I will cancel the upgrade.  I already know that I won’t need the IQ260 for longer exposures like 30 minutes or longer.  I also feel that none of the current Phase digital backs are good candidates for night photography utilizing stacking.  Stacking is by far the best way to maximize both the night sky and the foreground in a night landscape image.  Hopefully I will be able to shoot the IQ260 in mid April in Dallas with Digital Transitions.  Odds are it will be only a indoor shoot which is a total waste of time for me, but I may get lucky and they will allow for some outdoor shots.  Digital Transitions has a IQ260 in New York and they have been adding new images to their blog daily.


03/13/13 30 minute or Longer Exposures and IQ260, Do they make sense

Since Phase One announced the new IQ260, the majority of the talk has been about the use of this new back with long exposures, exposures up to 1 hour in length.  One aspect is the use of this back in night photography, where the photographer is working to capture the movement of the earth against the stars in the night sky which creates star trails.  If you dial down in to the features of the IQ260, you will find that it is going to operate pretty much the same way the older P45+ did, expect it will be using a higher base iso of 140.  If you have done a lot of night photography (I have logged hundreds of hours maybe over a thousand in the past 4 years) you may want to consider some of the points I have brought up.

Night Skies over Roark Bluff on the Buffalo River in Arkansas

45 minute single exposure taken with a Phase One P45+

I have been fascinated by the idea of longer exposures since I started in photography over 30 years ago.  More recently my  interests moved to  long exposures of the night sky of 1 hour or longer. Needless to say, when Phase One first announced the P45+ back in late 2007 I was quick to get on board, as it was really the 1st true digital camera that could handle this.  Yes the first.  Consider what was out there on the market in the Canon DSLR lineup. The Canon 1ds MKIII was announced but still not shipping the Canon 1ds MKII could barely handle iso 800 and no way could it do a exposure close to 1 hour long. The Canon 5D MKI was on the market and amazing folks with it’s clean files but it still had trouble when moving into longer exposures than 10 minutes.  Nikon I believe still did not have the D700 on the market and none of their pro bodies marketed at the time  would get a clean  1 hour exposure.  So when Phase One announced 1 hour, on a CCD it was big news.  Of course it didn’t happen until much later, more like mid 2008 and it took Phase One a few upgrades to get there, but they did it.  More importantly, it worked, and worked quite well within some limitations.

  1. Iso 50 only for exposures 30 minutes or longer
  2. Outdoor ambient temperature max 69 degree F for 1 hour exposures
  3. Lower humidity the better
  4. Mandatory dark frame after each long exposure (Long Exposure Noise Reduction)
  5. No more than 2 long exposures of 40 minutes or longer per battery

I was able to work within these limitations, some of which I found out about as I went out and started shooting, mainly the outdoor temperature limitations.  Trust me, if you try it past 69 degrees you will get a ruined image.  However during this time the DSLR world caught up with Phase One and quickly passed them with newer CMOS solutions.  All of a sudden, Canon had the 5D MKII and it truly was a wonder camera.  The 5D MKII set down some baselines in both noise and exposure length, standards that are still being used today 5 years later.

Canon allowed you to have a 22mp sensor in CMOS that would take a exposure as long as you wanted, (within reason is about 4 hours).  You still had to take a dark frame after this shot, but that is pretty much the norm on any exposure this long.  If you need to go longer, it’s back to film.  Canon did however allow you to control the LEN (Long Exposure Noise Reduction).  So for shorter exposures, you could elect to turn it off.  I believe Canon was the first camera company to allow this, quickly followed by Nikon and Sony.  One of the main reasons this is important is that if you are a night photographer, the best way to capture the night sky in by stacking.  Stacking allows you to work with ambient moonlight.  This moonlight will both illuminate the foreground of your shot so you have a true landscape image and it gives the night sky a wonderful blue hue.  If you leave the camera open for just one long exposure, your night sky will be overexposed and thus only the brightest stars will show.  So I quickly learned that stacking was the way to go for my work.

I was enamored enough by Phase One and the P45+ to continue to work with it in my night photography.  However with stacking the Phase One solution begins to have some pretty harsh limitations.

  1. the mandatory dark frame creates gaps in the star trails
  2. no interval timer for the Mamiya/Phase one camera body
  3. lack of corner sharpness with most Mamiya/Phase One wide angle lenses
  4. quick fall off of image quality with increases in iso past 50

Let me examine each of these in more detail.

1.  Mandatory dark frame creates gaps in the star trails.  This is a big problem.  Stacking requires that you figure out the best combination of iso, aperture and exposure for the specific night.  This will always be different due the amount of moonlight available.  For example a on a recent night shoot I found the combination to be iso 400, F4.5, for 2 minutes.  The best aperture for star work would be fully wide open, however no lens I have works that well wide open, so I tend to shoot at F3.2 to F5.  If you go any higher you will start to miss the faint stars.  This an easy solution for any current Nikon or Canon DSLR body, however with the P45+ or IQ260 you are going to be locked into a mandatory dark frame after each shot.  So here I would have 2 minute gap between each exposure.  This will ruin the flow of the star trails.  However there are 3rd party software applications out there that will fix this. I have found  they don’t play well with medium format lenses and I was never able to figure out the correct FOV to get the software to work.   This issue quickly made me move back to a single continuous exposure with a Phase One back.

2.  No interval timer for the Mamiya/Phase One camera body.  The only remote for the Phase One DF body is a basic single fire remote.  You can lock it for a longer exposure, but you can’t set it to take intervals which is necessary for stacking.  Thus you have to either hold it down for 2 minutes, and release, or lock it and watch a timer for 2 minutes.  Trust me over time say 40 minutes, you will make mistakes and end up not getting a even exposure process. This is an issue around the medium format camera body, so no matter which digital back you use, P45+ or IQ260, you will have to manually control it.

3. Lack of corner sharpness with most Mamiya/Phase One wide angle lenses.  This is just a given and the main reason I moved over to a tech camera for medium format as most of my photography requires wide angle lenses.   With night photography you are after the sky as your main subject which main you need to lead with a wide angle lens. You need to use as large an aperture opening as you can within reason.  The Mamiya 35mm F3.5 is really soft at F3.5 and does not really begin to get sharp until F8.  At F8, you will miss most of the stars in the sky.  The Mamiya 45mm F2.8 has the same problems  I briefly tried the Mamiya 28mm F4.5 but it really has trouble wide open and mine would not get sharp on the corners until F11.  With DSLRs you have a lot more lenses to try and odds are you will find one that will get the job done.  For example the Samyang 14mm F2.8 has really shown that it can get the job done from F4 on up and it costs less than $400.00.

4.  Quick fall off of image quality past the base iso of 50.  Phase One pretty much designed the longer exposures on the P45+ around iso 50.  You could try it longer at iso 100 and iso 200, but by 200 you were picking up  dark spots on the sensor.  These are not really noise but some form of digital reticulation.  I will get these same spots on Canon imagers when they start to get hot or are working in really hot evening temperatures past 85 degrees F.   These dark spots will ruin your image as nothing will really remove them.  You also will start to pick up enough noise that the quality of the image is compromised.  The iso 50 limitation was the other main reason I moved back to DSLR 35mm cameras since many times I will need to stack at iso 400 and sometimes as high as iso 800 which is beyond the realm of the P45+.  The newly announced IQ260 may handle this a bit better since it moves up to iso 140 when you start to take a longer exposure.

My point of all of this, is when you move away from the marketing hype and start working with long exposures of the night sky, you will start to realize that you are going to limit yourself to very specific shooting situations with a medium format digital back.  I am still hoping that with the new CCD sensor in the IQ260, photographers may be able to gain as much as 1.5 to 2 stops on range in the lower iso ranges of 50 t0 200.  The fact that the IQ260 is showing very good results up to 8 minutes in current testing is promising.  However I am much more interested in see exposures of 1 minute or less at iso 50 to determine if the shadow noise is less than what is contained in the current IQ160.


03/06/13 Follow up on New Phase One IQ260 Medium Format Digital Back

I received a detailed email response from Doug Peterson at Digital Transitions.  Digital Transitions is one of the largest Phase One dealers in the United States and has been very helpful in informing me about the features of the new IQ260.  There are the questions I asked immediately followed by Doug’s response.  Needless to say the sleeping giant has woken and hopefully these new announcements are just the start of series of new products from Phase One.

After reading your notes, I was wondering if the live view features are any easier to work with, or since it’s still CCD technology, with it work they same way as the Live works with the current 160?.
Live View is the same as the 160. No better. No worse.
The one hour exposure is amazing, and I was curious if this also had any effect on noise for higher iso work, on the 260?  mainly iso 400, to 1600?  Not as much in long exposures but just lower overall noise.  I am sure the iso 50-200 range will still be very clean
Normal high ISO is going to be similar to the 160, with some modest improvement.

Using the “long exposure mode” for standard high ISO work at short exposures: I have no clue, and honestly hadn’t thought about it. I’ll check into this right away.
Does the 260 still have sensor plus?
Yes. Up to ISO3200 (and my guess is ISO1600 will be decent)
Will phase be offering any upgrade incentives for 160 to 260? upgrades, like they did for the P65+ to 180?
Yes. There will be a cross grade offer. Michelle can provide you details.
Wi-Fi to any iOS device, will that allow you to use live view on a iPad? to help focus?
Live View WILL be implemented for iOS wireless, but that will not be ready out-of-the-gate. Only review of captured images (immediately after capture) will be ready at the time of launch. When Live View support is added it will still be the same quality as when you use it on the LCD of the digital back; this doesn’t suddenly make it CMOS.

[Read more…]

03/04/13 Big Day for Phase One–New IQ2x backs are announced

Phase One IQ260 backs new for 2013

Phase One IQ260 backs new for 2013

What a surprise to open my email and find that Phase One has announced a new series of IQ backs, the 260 series.  I received a very informative email from Doug Peterson at Digital Transitions this morning in regards to the new Phase One IQ260 backs.  In a nutshell it seems that the following features have been added:

  1. Wifi to any iOS device, at 1st ship playback, later to follow live view.  I am assuming this means ipad or macbookpro.
  2. Up to 1 hour exposures with the IQ260 @ iso 140 (interesting but I like this as it definitely should improve overall gain for late evening or night shots) I don’t know what the outdoor temperature range is as on the P45+ your 1 hour was limited to 69 degrees F.
  3. Slightly higher overall Dynamic Range with both the IQ260 over the IQ160 and the IQ280 over the IQ180.  About 1/2 a stop so now 13 for the IQ260 over the 12.5 on the IQ180
  4. Geotagging via GPS, I assume this is through the attachment of a Garmin or similar unit to the back.
  5. A new Archromatic back which offers B&W capture, with no color interpolation which should provide a very sharp file at 60MP.
  6. Remote operation of the camera and the ability to attach the camera to a TV for image review
  7. A new physical chip is being used in the IQ260, not sure if the IQ280 has a new chip or just some tweaks to get the 1/2 stop of DR

I feel that the base iso performance of the IQ260 will be better than the IQ160 as a new chip is being used for the IQ260 over the IQ160 and

It looks like the first actual units will ship sometime in June 2013 and some customers might be getting a few units a bit earlier.  Digital Transitions is having open houses in both their New York and and Dallas locations, where the new backs will be displayed and hopefully attendies can have some hands on with all three backs.  Pricing has been announced and will be handled in the U.S. by Phase One authorized dealers, like Digital Transitions.  I have seen that there are many upgrade paths available:

  1. P65+ to IQ280 $17,500
  2. P65+ to IQ260 (seems to be a more specialized offer)
  3. P45+ to IQ260 $22,500
  4. IQ160 to IQ260 $13,990
  5. It also appears that an existing value add warranty will carry over if you upgrade from a 160 to a IQ2x back.  Example, I have a 5 year value add warranty on my IQ160 with 3 3/4 years left.  If I upgrade in June 2013 what is left of my Value add will move to the IQ260 giving me about 3.5 years or so. That’s fair!

What all this means will vary depending on the needs of the photographer in question.  Everyone will have an opinion and I of course have mine.

Personally I moved from a P45+ to a IQ160 back in the fall of 2011 and still feel it’s one of the best decisions I ever made.  The increase in overall dynamic range between the P45+ and the IQ160 was huge.  For my landscape work, the ability to most times just take once shot and then work it for both shadows and highlights instead of having to bracket as I did with the P45+ made a huge difference in my workflow.  At the time I made the move to an IQ160, I also moved from a Phase One DF body and all Mamiya lenses to a Arca rm3di and several Rodenstock and Schneider lenses.

For my workflow, the one issue that has come up over and over is live view.  Since Phase One is using CCD’s instead of CMOS, it seems that it’s impossible to get a balanced image on the live view screen, especially in normal to bright outdoor light.  This is not new information to anyone using a Phase One back/tech camera solution, net it’s not going to look like live view on a Nikon, Canon or other DSLR.  I had hoped that the next refresh from Phase One would have fixed this or somehow found a work around.  They found a way to get back to 1 hour exposures!! surely some type of buffer could be figured out.  I feel it must not be a big priority for them which is a surprise to me.

For me with a Tech camera, the sweet spot is the IQ160-260 camera.  I don’t want to make the added investment in tech camera lenses that a IQ180-280 takes (Rodenstock 32mm, 40mm).  The cost of the 32mm Rodenstock with physical CF in an Arca mount is around 10K U.WI also found that in the few times I was able to shoot in the field with a IQ180, that it’s shadow noise was considerably more noticeable past iso 35.  In my work, being able to shoot at iso 35 is rare since the available shutter speeds will be too low as I have to take into account wind and stopping motion.  So now with a IQ260 on the table things get very interesting.   I feel that I should be able to get a better noise coefficient in all of my iso ranges, 50 to 800 before having to to use sensor plus, and then better for 1600 and 3200 with sensor plus.  The IQ160 does a very good job with Dynamic range in my shooting allowing me easily 2.5 stops of room in most shooting situations.  I have never worried about slightly overexposing my highlights to give my shadows a bit more reach.  With the IQ260 this may now stretch to 3 stops or more which would be impressive.

The ability to shoot clean exposures up to 1 hour again with all the features of a IQ series can only make me say I am glad I did not attempt to purchase a used P45+.  Sure Phase backs are well made but I would hate to send in a P45+ for a repair if Phase can even repair it now.  This new feature really won’t do much in daylight as I have often taken my IQ160 to exposures of 45 seconds to 1 minute with very good results at iso 50.  However for night photography, this is a bit deal.  You can now attempt to stack with a IQ260 and stacking is the way to go.  You will still have to tolerate the dark frame which will create a gap in a star series but there is software out that that will join the gaps and I have often joined gaps longer than 2 minutes.  The fact that you are starting at iso 140 to me a plus for night photography.

Geotagging, not a big deal to me. Even though I am in the field 98% of time I don’t use it with my DSLR’s as it’s just something else to keep up with.

Wifi, may be in the future but I don’t see wanting to add complexity to an already pretty complex setup with a tech camera.  Electronic firing of the shutter won’t be a factor on a tech camera as all the controls are manual and in the lens.  If Phase had implemented a more useable Live View option, then I feel this would be a bigger deal for me since you could gain more knowledge about your shot on a ipad or ipad mini.

USB3 will be working with these new backs when they ship (and it’s supposed to be coming very soon to the older IQ140/160/180 backs.  This will let you tether in the field, with a smaller laptop or possibly to a ipad.  Being able to tether to a macbookair 13″ has been a feature I would like to do.  My macbookair only has usb2 but I should be able to still run to a usb3 IQ back.  I only have 4mb of ram on this mackbook air and I know that is way low, so I may to come up with a upgrade in the future.  This is one feature I would like to see at any open house I attend, solid tethering oriented to the field not studio.

This is largest Phase One announcement I can remember since the rollout of the original IQ backs in 2010.  The fact that there is a somewhat competitive upgrade path for a IQ160 user is commendable for Phase One as this announcement has  overnight just killed the residual value of my IQ160.

Many thanks to Doug Peterson at Digital Transitions for his help in answering my questions.  You can read more from Doug here:

http://www.digitaltransitions.com/blog/dt-blog/phase-one-iq260-and-iq280-what-you-need-to-know


10/25/12 An interesting facet of Long Noise Reduction on the Nikon D800/e Cameras

Nikon D800 menu screen showing the Long noise reduction settings

Nikon D800 menu screen showing the Long noise reduction settings

While working in the woods over the past week, I was finally able to work with the long noise reduction settings on the Nikon D800e.  Long noise reduction can be a very important feature on any digital camera, since most sensors will generate more noise the longer they are left on in an exposure.  You can also pick up  “stuck” pixels when you leave the sensor on for periods longer than 5 seconds.  Stuck pixels will appear as solid red, blue green or pure white when you view the image.  Depending on the age of the camera and the overall time of exposure, stuck pixels can potentially ruin an shot.  Noise tends to be more a factor of overall heat, so again the longer a sensor is running taking a single exposure, the more heat can be generated creating noise, also the ambient can play a role in noise.  If you are working in outdoor temperatures  great than 60 degrees F and high humidity, then noise will then to be a bigger issue.

The best way to reduce stuck pixels is to shoot a “dark frame exposure” for the exact same time as the previous exposure.  You shoot this by leaving the lens cap on the lens and then recording a totally dark frame.  All the pixel information should be black so any stuck pixels can be mapped out since they will show up with either color or pure white.

Most modern digital cameras will do this process automatically by writing a dark frame after the exposure.  The camera will do the actual comparison and then map out the stuck pixel data.  As you can see in the picture at the top of the post, there will be a specific menu setting for this, allowing you to toggle it on or off.  Now here is the rub with the D800 series.

If you set long noise reduction to “on”, then the camera takes the dark frame but you are in essence locked out doing anything else for the duration of the dark frame.  So if you take a 20 second exposure, then after the first exposure you will have to wait for another 20 seconds while the dark frame is written.  You will see a message on the LCD blinking while the dark frame process is working.  While this process is running your camera is disabled from shooting anything else.  This doubles your wait time and that can be a huge disadvantage when you are shooting in waning light.  Most cameras allow for a dark frame exposure from exposures ranging from 1 second  or longer.

[Read more…]

10/20/12 NikonUSA no longer listing D800e on main DSLR product page

Nikon D800e not visible on Nikon USA product page

Nikon D800e not visible on Nikon USA product page

After reading a few posts on various photography forums over the past few days, it seems that Nikon has taken the D800e off of the main NikonUSA product page.  I was surprised to hear this, and thought that it might just be a reader error, however after looking at the page for myself, I found out that yes the D800e has been removed.  Also if you do a search for the D800e on NikonUSA’s main site, you will not find very many references to the camera.

Considering that the D800e has taken top place in the  “products that were announced but were very hard to purchase” category, Nikon may be reacting to some of the bad press that they have gotten for not being able to deliver the D800e.  The camera is still listed on all of the websites that sell Nkon that I checked and you can find it in stock on Amazon.  But it is very interesting that Nikon took the time to remove any references to the D800e on their main marketing website for both the USA and Canada.  

Here is a link to the main Nikon USA site showing the DSLR cameras.


10/26/12 Update:

From further information from readers and my own studying, it seems that Nikon has only taken the “focus” off the D800E by taking it off the main NikonUSA product page.  If you dig down deep enough you can find references to the D800E where Nikon Compares it to the D800, showing their tests of image quality.

If you search the Nikon site, you will find few references to the D800E, but in the Nikon Store you can still add it to the cart.  I feel that since Nikon is looking for sales in the 4th quarter, this was more of a business management move.  “Sell what’s on the truck mentality”.  The D800 and D600 on now shipping in normal quantities, but you still can’t get a D800E with any scheduled availability.


10/09/12 Further information on the D600 and MC-DC2 & MC-36

MC-30 to MC-DC2 converter

MC-30 to MC-DC2 converter

I have done a bit more research on the D600 and the remote timer issues.  Both the D800 and D600 come with a built in set of timers called:

  • Time lapse photography
  • Interval timer

One of my main goals was to use the D600 in my night photography pursuits.  Over a year ago, I stopped taking just single long exposures on the blub setting, and started to shoot stacks.  An example of a stack, is to shoot over a period of 40 minutes, with a series of 45 second exposures.  For my night photography, I prefer to work with the illumination of the moon, so you really can’t leave the camera open for long periods of time or the sky will just wash out and or you will only pick up the brightest stars.  Stacking allows you to have much more control of your environment also.

In the past with Canon or Nikon, I would use the remotes that had the built in interval timer.  You need to use the timer for two settings, length of exposure and interval.  The interval is always 1 and the exposure varies depending on the amount of moonlight.   Using the Nikon MC-36 remote, this is easy to do.  Using the built in interval timer on the camera is not.  You can set the interval timer to do 1 interval and a certain number of frames, but the time relies on the cameras set shutter speed for the length of the exposure.  Thus the longest exposure will be 30 seconds and most times at night with stacks that is not long enough.  So the built in timer is not an option.  The time lapse timer has the same shutter speed limitation, requiring the camera to not be in blub mode.  However I have found a new solution from the folks over in China that should work.  A converter that allows the MC-36 to plug in to the port where you plug in the MC-DC2.

MC-30 to MC-DC2 converter

MC-30 to MC-DC2 converter

If this works as advertised a photographer should be able to use all of the functions of the MC-36 on the D600.  I have ordered one and will test it soon to make sure.  If it won’t work or all the functions don’t work, then for me all bets are off for the D600.  I will report back as soon as this converter arrives.

10/07/12 Updates to my 10/02/12 Post on the D600 and bracketing issues

10/07/1230—–Thanks to some comments from readers, I have added some more comments to my 10/02/12 post.

I was concerned about the remotes since I wanted to use my MC-36 on the D600.  It has the the inter-voltmeter and interval timer, both critical for night work since I stack exposures.  I realize that the D600 has these features built in, but I had tried them on the D800 and just did not find them to be very reliable.  The few times I tried the built in interval timer and inter-voltmeter the camera with locked up after a short time or just shut off after about 30 minutes (on a 1 hour exposure using 30 second stacks).  I also feel that the D800 is too much camera for night work in that I just don’t need that much resolution and had wanted to move over to the D600 (but use the MC-36 since it give more control).  It’s possible to use the Nikon MC-DC2 through the accessory port and several other wi-fi solutions to fire the camera.  I will reconsider the D600 with the MC-DC2 after I test it for a few evening stacks. 

Many other readers have assured me that in using the Scan Disk Extreme SD cards they are not seeing any slow downs.  I still would prefer to be able to use one of the many Scan Disk extreme compact flash cards.  I don’t like having to carry two separate types of media in the field.

I may even up reversing my concerns on bracketing once I shoot a D600 some more.  I have used the D800 and D800E enough now to realize that the vastly increase Dynamic Range of these camera can totally eliminate the need for traditional need for exposure bracketing.  I quickly realized that for most of my work, I can get great images by just shooting 3 brackets at around +-1.5ev.  Occasionally certain shooting situations may require 4 but that is an exception.  So now I think that Nikon may have given the D600 a better bracketing solution than the +-1.5 on D800 since you can take +-2ev exposure brackets.  I would hope that a firmware upgrade to the D800 might allow for an increase to at least +- 1.5 in the future.   Without a doubt, these new Nikon sensors are revolutionary designs.

10/02/12 Nikon creates bracketing differences between the D800 and D600

I have now taken out a D600 for a quick test spin.  I had hoped that Nikon would not disable too many of the “pro” features that they have with the D800.  Right from the start, I found that Nikon drastically changed the exposure bracketing between the D800 and D600.

Nikon-D600 view from the front

Nikon-D600 view from the front

With the D600, a photographer now only has the option of 3 brackets.  However you can use a larger exposure range between brackets, as much as +2ev.  It may be even a bit more, but I was in a hurry and when I noticed that you can only get 3 brackets per series, I was immediately turned away.  The main issue I have had since January 2009 when I first started shooting with a Canon 5D MKII was the fact that Canon only allowed for 3 brackets and to get 5 or more you had to have a “pro” body like the 1ds MKIII or 1d MKIiv, both of which I have briefly owned.  I figured out that the best solution for the 5D MKII was to just move the exposure manually, but you had to be very careful not to move the body of the camera since then you would get misaligned frames.

[Read more…]